
Tired of dry, overcooked chicken breasts that taste like cardboard no matter how much sauce you drown them in? Honey Garlic Chicken Breast changes everything you thought you knew about cooking this lean protein. Imagine perfectly tender, juicy chicken coated in a glossy, sweet-savory glaze that caramelizes into sticky perfection all ready in just 25 minutes from start to finish.
Hi there, I’m Simon, and this Honey Garlic Chicken Breast has rescued more weeknight dinners in my kitchen than I can count. The secret came from Jackson Reed, our grill master, who discovered that pounding the chicken to even thickness is the game changer everyone overlooks. Megan Carter contributed the honey-to-garlic ratio that creates the perfect balance of sweet and savory without overwhelming either flavor. Together, we’ve refined this recipe through countless tests until it became absolutely foolproof. In this guide, you’ll discover how to select the best chicken breasts, master the pounding technique that ensures even cooking, nail the perfect glaze consistency, and customize this versatile recipe for any occasion.
Why This Honey Garlic Chicken Breast Recipe Works
This isn’t just another chicken recipe it’s a masterclass in achieving restaurant-quality results with minimal effort. Here’s what makes this Honey Garlic Chicken Breast genuinely exceptional:
- Uses affordable, easy-to-find chicken breasts: Budget-friendly protein that’s available everywhere year-round
- Ready in 25 minutes for maximum convenience: From refrigerator to dinner table faster than takeout delivery
- Perfect for weeknights or meal prep: Cook once, eat all week reheats beautifully without drying out
- Foolproof moisture technique: Pounding to even thickness guarantees juicy results every single time
- Five-ingredient glaze: Honey, garlic, soy sauce, ginger, and a touch of acid create complex flavor
- Versatile base recipe: Works with any side dish and adapts to countless flavor variations
Choosing the Right Chicken for Honey Garlic Chicken Breast
The foundation of exceptional Honey Garlic Chicken Breast starts with selecting quality chicken. Your choice determines the difference between dry, stringy meat and succulent, tender perfection.
Best Chicken Breasts for This Recipe
Boneless, skinless chicken breasts are the standard for Honey Garlic Chicken Breast, but not all breasts are created equal:
- Medium-sized breasts (6-8 ounces each): Easier to pound evenly and cook uniformly
- Air-chilled chicken: Superior texture and flavor compared to water-chilled
- Organic or free-range: Better taste and firmer texture, though pricier
- Fresh, never frozen: Retains more moisture and browns better
- Avoid pre-marinated: These contain sodium solutions that alter texture
Why boneless, skinless works best:
- Absorbs marinade quickly (15 minutes is sufficient)
- Cooks rapidly and evenly when pounded thin
- Creates maximum surface area for caramelized glaze
- Leaner and more versatile than thighs for this preparation
Buying Tips for Quality Chicken Breasts
Look for these quality indicators when shopping for Honey Garlic Chicken Breast:
- Pale pink color: Fresh chicken should be light pink, never gray or yellow
- Firm, plump texture: Should spring back when touched, not feel slimy or sticky
- Minimal liquid in package: Excess juice indicates old chicken or added water
- Fresh, clean smell: Should have virtually no odor; never sour or ammonia-like
- Check the date: Use-by date should be at least 3-4 days out
- Ask your butcher: Request fresh-cut breasts from whole chickens for premium quality
Chicken Substitutions for Honey Garlic Chicken Breast
While this recipe is optimized for breasts, these alternatives work beautifully:
- Chicken thighs: Use boneless, skinless; darker meat stays juicier and more forgiving if slightly overcooked
- Chicken tenderloins: Already thin, so skip pounding; reduce cooking time to 3-4 minutes per side
- Turkey cutlets: Lean and mild like chicken; use identical preparation and cooking times
- Tofu or tempeh: For vegetarian version, press extra-firm tofu, slice thick, and use same glaze
Ingredients & Prep for Honey Garlic Chicken Breast
Meat Prep Essentials for Honey Garlic Chicken Breast
Proper chicken preparation is absolutely crucial for Honey Garlic Chicken Breast success:
- Pound to even thickness: Place chicken between plastic wrap, pound to ½-inch thickness throughout—this is NON-NEGOTIABLE for juicy results
- Trim excess fat: Remove any visible fat or tendon pieces for cleaner presentation
- Pat completely dry: Use paper towels to remove all surface moisture (wet chicken won’t brown)
- Score if thick: If chicken is over 1 inch thick, make shallow diagonal cuts to help it cook evenly
- Room temperature: Remove from refrigerator 15 minutes before cooking for even heat penetration
Honey Garlic Chicken Breast Marinade Ingredients
For the Chicken:
- 4 boneless, skinless chicken breasts (6-8 oz each)
- 1 teaspoon kosher salt
- ½ teaspoon black pepper
- 2 tablespoons olive oil (for cooking)
For the Honey Garlic Glaze:
- ⅓ cup honey
- 6 cloves garlic, minced (about 2 tablespoons)
- 3 tablespoons soy sauce (low-sodium)
- 1 tablespoon fresh ginger, grated
- 1 tablespoon apple cider vinegar
- ¼ teaspoon red pepper flakes (optional)
- 1 tablespoon butter (for finishing)
- 1 teaspoon cornstarch + 1 tablespoon water (for thickening)
For Garnish:
- Sesame seeds
- Sliced green onions
- Fresh cilantro
Pantry Staples That Elevate Honey Garlic Chicken Breast
- Quality honey: Raw, unprocessed honey has superior flavor; avoid artificial honey blends
- Fresh garlic: Pre-minced jarred garlic works in a pinch, but fresh is dramatically better
- Low-sodium soy sauce: Gives control over salt levels; regular soy sauce can be too salty
- Fresh ginger: Ground ginger doesn’t provide the same bright, zingy flavor
- Apple cider vinegar: Balances sweetness and helps tenderize chicken
Step-by-Step Cooking Instructions for Honey Garlic Chicken Breast
Pre-Cooking Prep for Honey Garlic Chicken Breast
- Pound chicken breasts: Place between plastic wrap, pound to even ½-inch thickness using meat mallet
- Pat dry thoroughly: Use paper towels to remove all moisture from chicken surface
- Season both sides: Sprinkle evenly with salt and pepper
- Prep the glaze: Whisk together honey, garlic, soy sauce, ginger, vinegar, and red pepper flakes in a bowl
- Mix cornstarch slurry: Combine cornstarch and water in small cup, set aside
- Bring to room temp: Let seasoned chicken sit for 15 minutes
Cooking Method for Honey Garlic Chicken Breast
Step 1: Sear the Chicken (8 minutes)
- Heat 2 tablespoons olive oil in large skillet over medium-high heat until shimmering
- Carefully add chicken breasts, laying away from you to prevent splatter
- Don’t move or touch for 4 minutes let crust develop
- Flip once, cook another 3-4 minutes until golden brown
- Internal temperature should reach 155°F (carryover cooking will bring to 165°F)
- Transfer chicken to plate and tent with foil
Step 2: Create the Honey Garlic Glaze (4 minutes)
- Reduce heat to medium, carefully pour off excess oil (leave about 1 tablespoon)
- Pour honey garlic mixture into the same hot pan
- Bring to gentle simmer, stirring constantly and scraping up browned chicken bits
- Cook for 2 minutes until fragrant and slightly reduced
- Stir cornstarch slurry, then add to pan while stirring continuously
- Simmer 1-2 minutes until glaze thickens and becomes glossy
Step 3: Glaze and Finish (3 minutes)
- Return chicken breasts to pan, turning to coat completely in glaze
- Spoon glaze over tops repeatedly for 1-2 minutes
- Add butter, swirl pan until melted and incorporated
- Continue spooning glaze over chicken until deeply coated
- Remove from heat when glaze clings to chicken like syrup
Doneness Check for Honey Garlic Chicken Breast
- Internal temperature: Must reach 165°F in thickest part when measured with instant-read thermometer
- Juice test: Pierce with knife juices should run clear, never pink
- Texture test: Chicken should feel firm but still springy, not hard or rubbery
- Visual check: No pink remaining in center when cut open
Resting Honey Garlic Chicken Breast
Let the cooked Honey Garlic Chicken Breast rest for 5 minutes before slicing. This crucial step allows juices to redistribute throughout the meat. Cutting immediately causes all moisture to run out onto the cutting board. During resting, the internal temperature rises from 155°F to a safe 165°F, ensuring food safety without overcooking.
Pro Tips for Perfect Honey Garlic Chicken Breast
Avoiding Common Honey Garlic Chicken Breast Mistakes
Problem: Dry, tough chicken
- Pound to even ½-inch thickness uneven thickness means part overcooks while part undercooks
- Don’t cook past 165°F internal temperature every degree over dries it out
- Use medium-high heat, not scorching high heat which cooks outside too fast
- Let rest 5 minutes impatient slicing releases all the juices
Problem: Burnt garlic in the glaze
- Don’t add raw garlic directly to hot pan it burns in seconds
- Mix garlic into honey mixture first, protecting it with liquid and sugar
- Use medium heat when making glaze, never high heat
- Stir constantly while glaze cooks
Problem: Thin, watery glaze
- Don’t skip the cornstarch slurry—honey alone won’t thicken properly
- Let glaze simmer until it reduces and thickens noticeably
- Add cornstarch gradually; you can always add more but can’t remove excess
- Glaze continues thickening as it cools
Tool Recommendations for Honey Garlic Chicken Breast
- Meat mallet or rolling pin: Essential for pounding chicken to even thickness
- Instant-read thermometer: Takes guessing out of doneness; invest in quality
- Large skillet (12-inch): Prevents overcrowding and ensures proper browning
- Tongs: For flipping chicken without piercing and losing juices
- Whisk: For mixing glaze and incorporating cornstarch smoothly
Storage & Reheating Honey Garlic Chicken Breast
Refrigerator: Store in airtight container with extra glaze for up to 4 days. Keeps chicken moist during storage.
Freezer: Freeze cooked chicken (without glaze) for up to 3 months. Make fresh glaze when reheating for best flavor.
Reheating: Microwave with splash of water for 60-90 seconds, or reheat in skillet over medium-low heat with extra honey and soy sauce. Avoid overcooking during reheating—just warm through.
Flavor Variations for Honey Garlic Chicken Breast
Spicy Honey Garlic Chicken Breast Twist
Transform this recipe into a fiery delight:
- Increase red pepper flakes to 1 teaspoon
- Add 1-2 tablespoons sriracha to the glaze
- Use chili-infused honey for extra heat
- Garnish with sliced fresh jalapeños and crushed red pepper
Keto/Paleo Honey Garlic Chicken Breast
Make this recipe low-carb and paleo-friendly:
- Replace honey with sugar-free monk fruit sweetener (⅓ cup)
- Use coconut aminos instead of soy sauce
- Skip cornstarch, reduce glaze naturally by simmering longer
- Serve over cauliflower rice
- Macros per serving: 3g net carbs, 38g protein, 9g fat
Global Flavors in Honey Garlic Chicken Breast
Korean-Inspired: Add gochugaru (Korean chili flakes) and sesame oil, garnish with kimchi
Thai Style: Use fish sauce instead of soy sauce, add lime juice and fresh basil
Caribbean Twist: Add allspice, thyme, and lime zest; serve with mango salsa
Mediterranean: Replace ginger with oregano and lemon juice, add sun-dried tomatoes
Honey Garlic Chicken Breast Variations Comparison
| Variation | Key Flavor Additions | Heat Level | Best Served With | Prep Time |
|---|---|---|---|---|
| Classic Honey Garlic Chicken Breast | Ginger, soy sauce, garlic | Mild | Rice, vegetables | 25 min |
| Spicy Version | Sriracha, red pepper flakes | Hot | Asian slaw, noodles | 25 min |
| Keto/Paleo | Monk fruit, coconut aminos | Mild | Cauliflower rice | 25 min |
| Korean-Inspired | Gochugaru, sesame oil | Medium | Kimchi, rice | 28 min |
| Thai Style | Fish sauce, lime, basil | Medium | Jasmine rice, cucumber | 27 min |
Serving Suggestions for Honey Garlic Chicken Breast
Your Honey Garlic Chicken Breast pairs beautifully with sides that complement its sweet-savory profile.
Rice & Grains:
- Steamed white rice: Classic pairing that soaks up extra glaze
- Coconut rice: Sweet undertones enhance the honey
- Quinoa pilaf: Nutty, protein-packed alternative
- Fried rice: Turn leftovers into complete meal
Vegetable Sides:
- Roasted broccoli: Slight char contrasts with sweet glaze
- Sautéed green beans: Crisp texture and clean flavor
- Asian cucumber salad: Cool, refreshing counterpoint
- Roasted Brussels sprouts: Caramelized edges match the glaze
Salads:
- Mixed green salad: Light vinaigrette cuts through richness
- Asian chopped salad: Cabbage, carrots, mandarin oranges
- Spinach and avocado: Creamy, nutrient-dense pairing
Beverage Pairings:
- Iced green tea: Clean, refreshing, traditional
- Sparkling water with lime: Palate-cleansing acidity
- Fresh lemonade: Tart sweetness complements glaze
FAQs About Honey Garlic Chicken Breast
Can I use frozen chicken breasts for Honey Garlic Chicken Breast?
Yes, but thaw completely in the refrigerator first (8-12 hours). Frozen chicken releases excessive water during cooking, preventing proper browning and diluting the glaze. After thawing, pat extremely dry with paper towels before seasoning and cooking.
How do I fix overcooked Honey Garlic Chicken Breast?
Unfortunately, you can’t reverse overcooked chicken, but you can improve it. Slice thinly and serve with extra glaze to add moisture. For future prevention, use an instant-read thermometer and remove chicken at exactly 165°F. The 5-minute rest period is crucial don’t skip it.
Can I make Honey Garlic Chicken Breast in the oven?
Absolutely! Sear chicken in oven safe skillet for 2 minutes per side, then transfer to 375°F oven for 12-15 minutes until 165°F internal temperature. Make glaze on stovetop separately, then pour over baked chicken and broil 2 minutes for caramelization.
Is Honey Garlic Chicken Breast safe during pregnancy?
Yes, when chicken reaches 165°F internal temperature throughout. Use a meat thermometer to verify—no pink should remain. The honey, garlic, and other ingredients are all safe during pregnancy when chicken is fully cooked.
Why is my Honey Garlic Chicken Breast glaze not sticking?
Glaze won’t stick if chicken is wet or if glaze is too thin. Ensure chicken is completely dry before cooking. If glaze is thin, simmer longer to reduce, or add more cornstarch slurry (½ teaspoon cornstarch + 1 tablespoon water) and simmer 1 minute.
Can I use chicken thighs instead of breasts for Honey Garlic Chicken Breast?
Yes! Boneless, skinless thighs work excellently they’re more forgiving and stay juicier. Cook for 6-7 minutes per side until internal temperature reaches 175°F (thighs are best slightly higher than breasts). Cooking time increases by about 3-4 minutes total.
How can I make the glaze thicker for Honey Garlic Chicken Breast?
For thicker glaze, double the cornstarch slurry (2 teaspoons cornstarch + 2 tablespoons water). Add gradually while stirring, simmering 1 minute after each addition until desired consistency. Glaze should coat the back of a spoon and cling to chicken.
Conclusion
Honey Garlic Chicken Breast proves that simple ingredients, when treated with proper technique, create extraordinary results. This isn’t just another weeknight chicken recipe it’s your solution to boring dinners, picky eaters, and the eternal question of “what’s for dinner?” Sweet, savory, sticky, and absolutely irresistible, this chicken delivers restaurant-quality flavor in less time than it takes to order delivery.
If you found this recipe helpful, we encourage you to share it with your network or save it for future use.
We’d be delighted to see your unique creations feel free to share your photos with us pinterest
Print
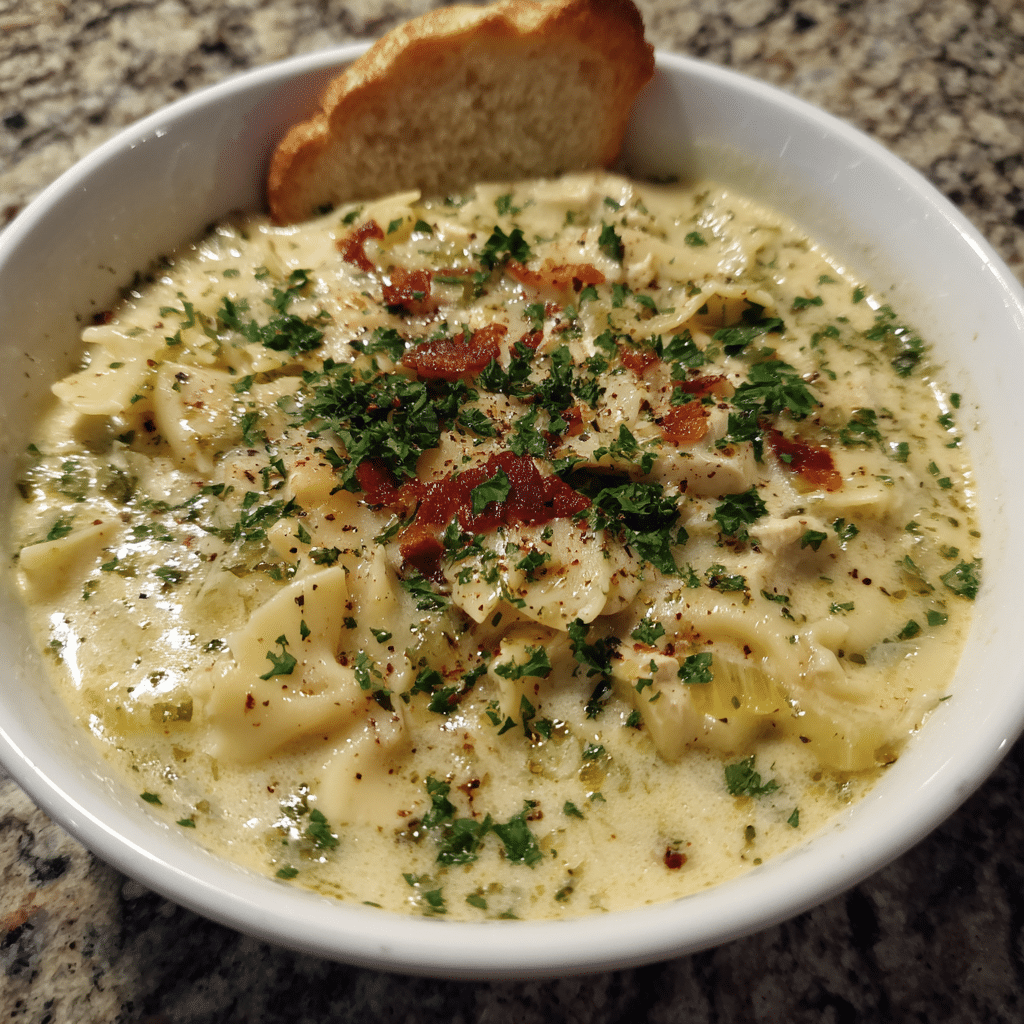
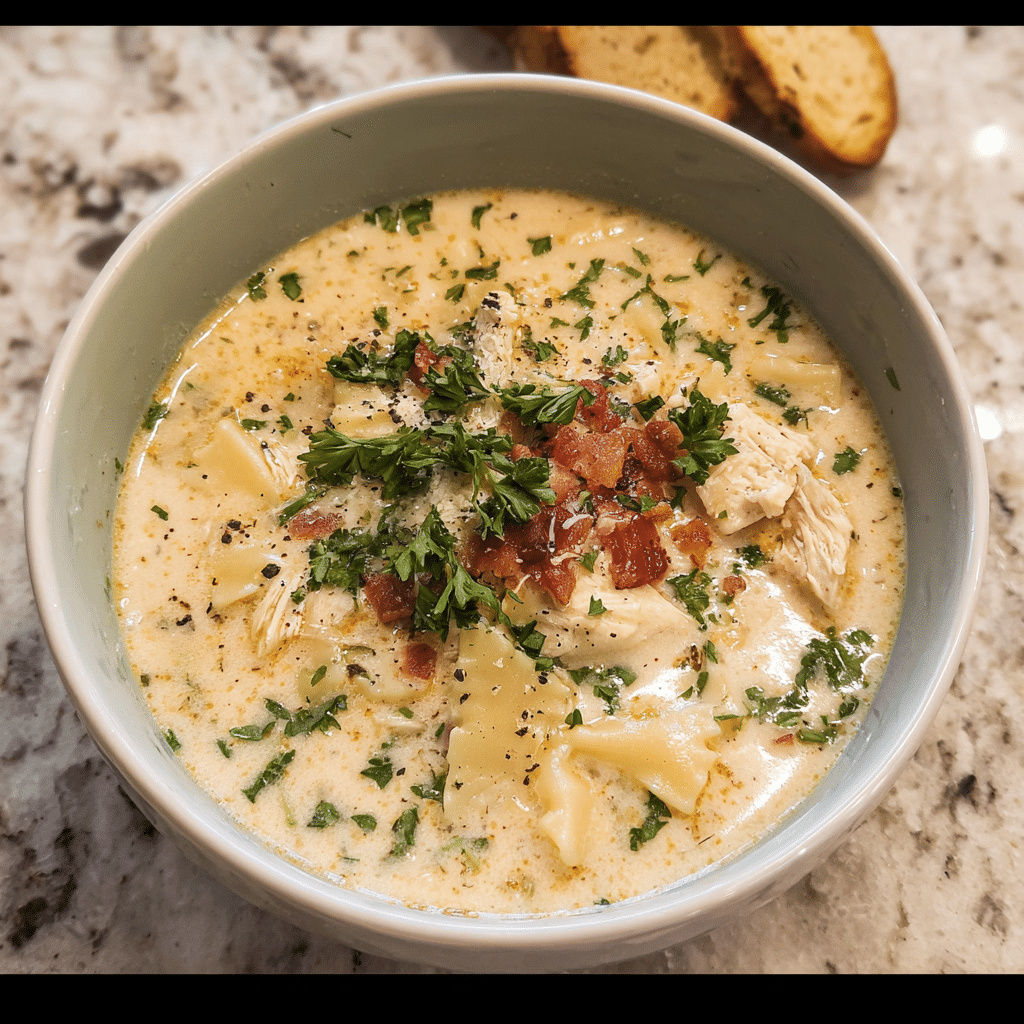
White Lasagna Soup 8 Secrets to Creamy Perfection
- Total Time: 50
- Yield: 8 1x
Description
This White Lasagna Soup captures all the creamy, cheesy, garlicky flavors of classic white lasagna in an easy one-pot recipe ready in just 35 minutes. With tender chicken, savory Italian sausage, broken lasagna noodles, and a rich ricotta-mozzarella broth, this soup is pure comfort food magic. Perfect for busy weeknights or cozy weekend dinners!
Ingredients
1 pound boneless, skinless chicken breasts
12 oz Italian chicken sausage links, sliced into ½-inch rounds
2 tablespoons olive oil
1 medium yellow onion, diced
4 cloves garlic, minced
2 tablespoons all-purpose flour
6 cups low-sodium chicken broth
2 cups whole milk (or half-and-half)
8 oz lasagna noodles, broken into 2-inch pieces
1 cup ricotta cheese (whole milk)
1½ cups shredded mozzarella cheese, divided
½ cup grated Parmesan cheese, plus more for garnish
2 cups fresh spinach, roughly chopped
1 teaspoon dried Italian seasoning
½ teaspoon dried basil
¼ teaspoon red pepper flakes (optional)
1 teaspoon sea salt
½ teaspoon black pepper
Fresh basil for garnish
Instructions
1. Pat chicken breasts dry and season both sides with salt and pepper.
2. Heat olive oil in a large Dutch oven over medium-high heat. Add chicken breasts and cook 4-5 minutes per side until golden brown and internal temp reaches 165°F. Remove to a plate.
3. Add sliced sausage to the pot. Cook 3-4 minutes, stirring occasionally, until browned. Remove to plate with chicken.
4. Reduce heat to medium. Add diced onion and cook 3-4 minutes, scraping up browned bits, until softened.
5. Add minced garlic and cook 1 minute until fragrant, stirring constantly.
6. Sprinkle flour over onion and garlic. Stir constantly for 1 minute to cook out raw flour taste.
7. Slowly pour in chicken broth while stirring to prevent lumps. Add Italian seasoning, dried basil, red pepper flakes (if using), salt, and pepper. Bring to a boil.
8. While broth comes to a boil, shred the chicken using two forks into bite-sized pieces.
9. Add broken lasagna noodles to boiling broth. Reduce heat to medium and cook 10-12 minutes, stirring occasionally, until noodles are al dente.
10. Reduce heat to low. Stir in whole milk and return shredded chicken and sausage to the pot. Simmer 2-3 minutes until heated through.
11. In a small bowl, mix ricotta cheese with ½ cup hot soup broth to temper. Stir ricotta mixture back into soup.
12. Add 1 cup mozzarella and Parmesan cheese, stirring gently until melted and smooth.
13. Stir in chopped spinach and cook 1-2 minutes until just wilted.
14. Ladle into bowls and top with remaining ½ cup mozzarella, extra Parmesan, and fresh basil. Serve immediately.
Notes
Don’t boil the soup after adding milk and cheese—keep heat at low-medium to prevent separation.
Always temper the ricotta with hot broth before adding to prevent clumping.
Use freshly grated cheese for the smoothest melting—pre-shredded contains anti-caking agents.
Noodles will absorb liquid as soup sits. Add extra broth or milk when reheating.
For meal prep, cook noodles separately and store apart from soup to prevent mushiness.
This soup can be frozen for up to 2 months, but freeze without noodles for best texture.
Whole milk or half-and-half is essential—low-fat dairy will separate and become grainy.
The soup thickens considerably as it cools. Thin with additional broth to desired consistency.
- Prep Time: 15
- Cook Time: 35
- Category: Soup
- Method: Stovetop
- Cuisine: Italian-American
Nutrition
- Serving Size: 1
- Calories: 385
- Sugar: 6
- Sodium: 780
- Fat: 18
- Saturated Fat: 8
- Unsaturated Fat: 8
- Trans Fat: 0
- Carbohydrates: 28
- Fiber: 2
- Protein: 28
- Cholesterol: 95
Keywords: white lasagna soup, creamy soup, Italian soup, chicken sausage soup, one pot meal, comfort food