Tired of showing up to holiday gatherings with store bought desserts that lack that homemade wow factor? Last Christmas, I watched my sister nervously present a deflated cheesecake that cracked down the middle, and I knew I had to create a foolproof recipe. That’s when I developed this stunning Oreo Crust Red Velvet Cheesecake a show stopping dessert that combines the rich, velvety texture of classic red velvet cake with creamy cheesecake perfection, all nestled on a crunchy chocolate Oreo base.
This Oreo Crust Red Velvet Cheesecake delivers bakery-quality results without the intimidation factor. The crimson swirls against snowy cream cheese create an Instagram worthy presentation, while the chocolate cookie crust adds textural contrast that keeps every bite interesting. As someone who’s worked alongside Megan Carter, our pastry genius, for years, I’ve learned that the secret to perfect cheesecake isn’t magic it’s technique. Megan spent three weeks testing this recipe in our kitchen, adjusting cream cheese ratios and baking temperatures until we achieved that signature creamy texture with zero cracks.
In this comprehensive guide, I’ll walk you through everything you need to know: selecting the right ingredients for maximum creaminess, mastering the water bath technique that prevents cracks, understanding precise baking temperatures, and creating stunning decorative swirls. By the end, you’ll have the confidence to create a dessert that makes people ask, “You really made this yourself?”
Why This Oreo Crust Red Velvet Cheesecake Works
This Oreo Crust Red Velvet Cheesecake succeeds where other holiday desserts fail because it balances indulgence with achievability. Here’s what makes it special:
- No-fuss Oreo crust: Requires just two ingredients and 10 minutes to prepare – no blind baking needed
- Foolproof cream cheese base: Room temperature ingredients and proper mixing create silky-smooth texture every time
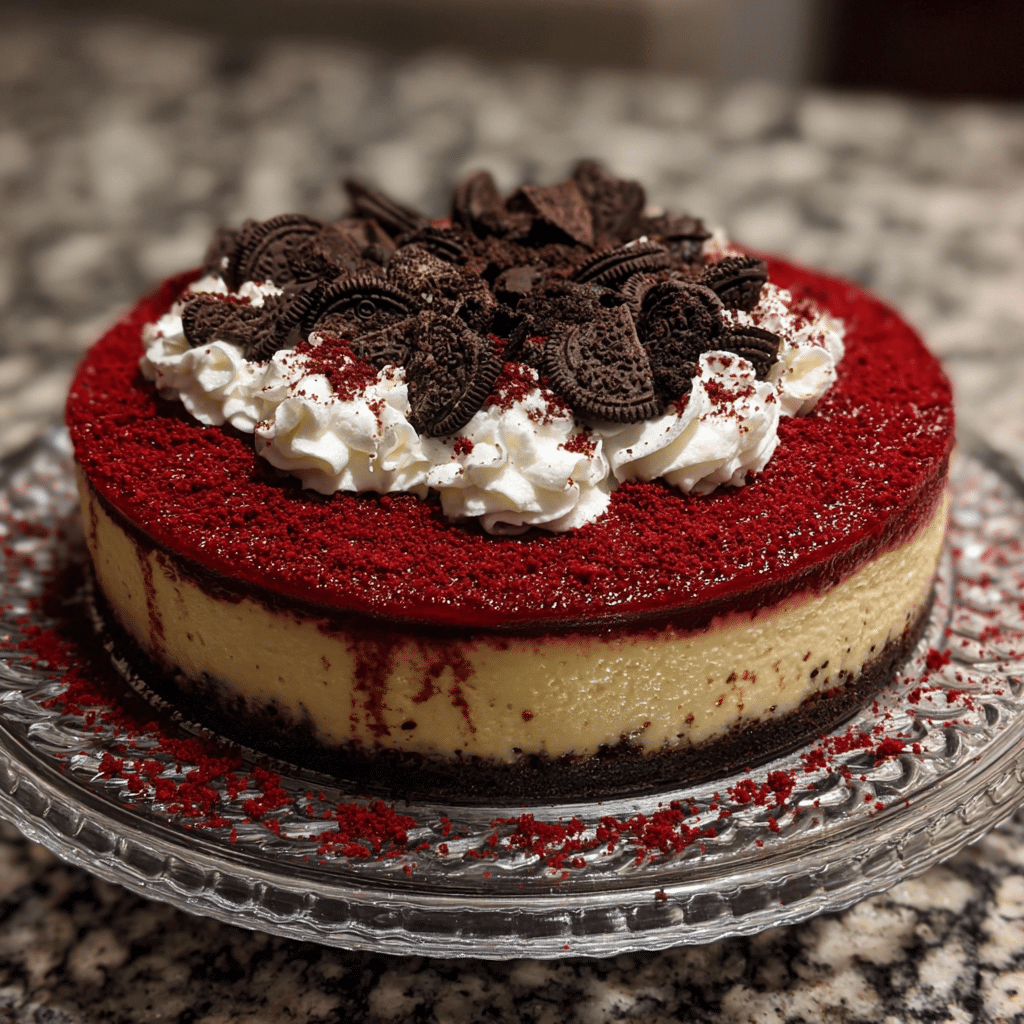
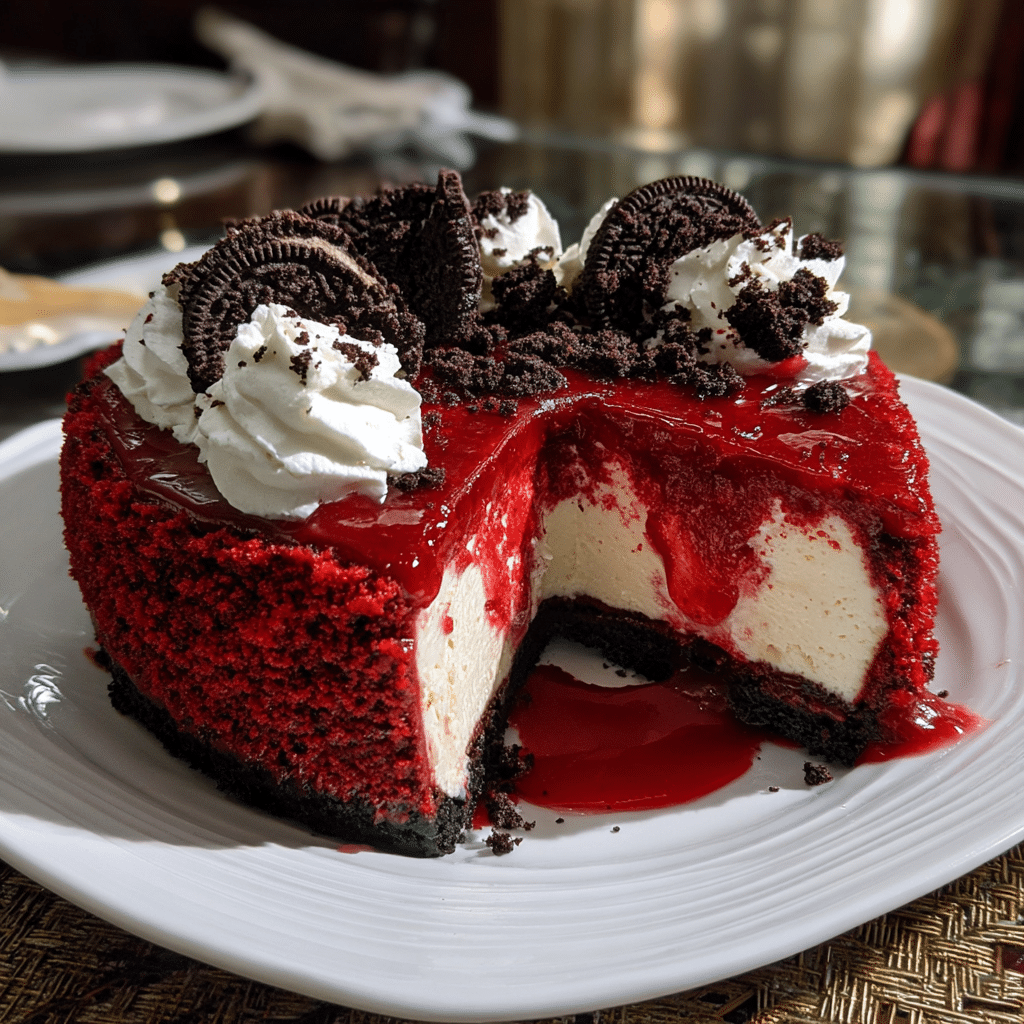
- Stunning visual appeal: The crimson red velvet swirls against white cheesecake create a festive, elegant presentation
- Make-ahead friendly: Best when chilled overnight, making it perfect for stress-free holiday entertaining
- Flavor harmony: Chocolate, vanilla, and subtle cocoa notes create a sophisticated dessert that’s not overly sweet
- Feeds a crowd: One 9-inch cheesecake serves 12-16 guests generously
Choosing the Right Ingredients for Oreo Crust Red Velvet Cheesecake
Quality ingredients make the difference between a good cheesecake and an extraordinary one. Let me guide you through what works best for this Oreo Crust Red Velvet Cheesecake.
Best Cream Cheese for This Recipe
Full-fat cream cheese is non-negotiable for achieving that signature dense, creamy texture. I exclusively use Philadelphia brand cream cheese blocks (never the spreadable tubs, which contain stabilizers that affect texture). Buy the rectangular 8-ounce blocks and let them sit at room temperature for 2-3 hours before starting. Cold cream cheese creates lumps that no amount of mixing will smooth out, and overmixing to compensate incorporates excess air that causes cracks.
Oreo Cookie Selection
Regular Oreos (not Double Stuf) work perfectly for the crust. The filling-to-cookie ratio is already ideal, so there’s no need to scrape out the cream. I’ve tested this recipe with generic chocolate sandwich cookies, and while they work in a pinch, name-brand Oreos provide superior crunch and deeper chocolate flavor. You’ll need about 24 cookies (one standard 14.3-ounce package contains plenty).
Red Velvet Essentials
Quality cocoa powder and gel food coloring are your secret weapons. Use unsweetened cocoa powder (not hot chocolate mix) for authentic red velvet flavor. Gel food coloring produces vibrant red without adding excess liquid that could thin your batter. Liquid food coloring requires so much volume that it affects the cheesecake’s texture and creates pale pink rather than true red. I prefer Americolor Super Red or Wilton Red gel colors.
Ingredients & Prep for Oreo Crust Red Velvet Cheesecake
Oreo Crust Components
- 24 Oreo cookies (about 2 cups when crushed)
- 5 tablespoons unsalted butter, melted
- Pinch of salt
Red Velvet Cheesecake Filling
- 32 ounces (four 8-oz blocks) cream cheese, room temperature
- 1¼ cups granulated sugar
- 1 cup sour cream, room temperature
- 4 large eggs, room temperature
- 2 teaspoons pure vanilla extract
- 3 tablespoons unsweetened cocoa powder
- 1 tablespoon red gel food coloring
- ¼ teaspoon salt
Essential Prep Work
The most critical step is bringing all dairy ingredients to room temperature. This takes 2-3 hours on the counter, but it’s absolutely essential. Cold ingredients won’t blend smoothly, creating lumpy batter and requiring overmixing that incorporates too much air. Set out your cream cheese blocks, sour cream, and eggs first thing in the morning if you plan to bake in the afternoon.
Wrap the outside of your 9-inch springform pan with two layers of heavy-duty aluminum foil, extending the foil up the sides. This waterproofs your pan for the water bath technique that ensures even baking and prevents cracks. Don’t skip this step even “leakproof” springform pans can allow water to seep in.
Creating Perfect Oreo Crumbs
Place Oreo cookies in a food processor and pulse 10-12 times until you have fine, uniform crumbs resembling damp sand. Alternatively, place cookies in a sealed plastic bag and crush with a rolling pin, though this requires more effort to achieve fine texture. Avoid over-processing into powder – you want small crumbs with slight texture that will pack together when pressed.
Step-by-Step Cooking Instructions for Oreo Crust Red Velvet Cheesecake

Pre-Baking Prep for Oreo Crust Red Velvet Cheesecake
Preheat your oven to 325°F (163°C) and position the rack in the lower third of the oven. This lower position prevents the top from over-browning while the center sets properly. Place a large roasting pan on the lower rack – you’ll fill this with water later for the water bath.
Spray your 9-inch springform pan with nonstick cooking spray, then wrap the outside completely with two layers of heavy-duty aluminum foil. Make sure the foil extends at least halfway up the sides. This double layer prevents any water from the bath from seeping into your crust.
In a medium bowl, combine Oreo crumbs, melted butter, and a pinch of salt. Mix with a fork until the mixture resembles wet sand and holds together when squeezed. Press this mixture firmly into the bottom of your prepared pan, using the bottom of a measuring cup or glass to create an even, compact layer. Extend the crust slightly up the sides (about ½ inch) for a professional look. Refrigerate while you prepare the filling.
Making the Filling for Oreo Crust Red Velvet Cheesecake
In a large mixing bowl using an electric mixer on medium low speed, beat the room temperature cream cheese for 2-3 minutes until completely smooth with no lumps. Scrape down the sides and bottom of the bowl frequently this is crucial for lump-free batter. Add sugar and beat for another 2 minutes until light and fluffy.
Add sour cream and vanilla extract, beating on low speed until just combined. The sour cream adds tanginess and extra creaminess that balances the sweetness beautifully. Add eggs one at a time, mixing on the lowest speed after each addition just until the yellow disappears. Overmixing after adding eggs incorporates too much air, which causes cracks during baking.
Remove 2 cups of the plain cheesecake batter and set aside in a separate bowl. To the remaining batter in your main bowl, add cocoa powder and red gel food coloring. Mix on low speed until the color is uniform and vibrant. The cocoa powder provides that signature red velvet flavor while the gel coloring creates that stunning crimson hue.
Baking Method for Oreo Crust Red Velvet Cheesecake
Pour the red velvet batter over your chilled Oreo crust, spreading it evenly with a spatula. Dollop spoonfuls of the reserved plain cheesecake batter on top in 8-10 spots across the surface. Using a butter knife or wooden skewer, gently swirl the two batters together by dragging the knife through in figure-eight motions. Don’t overmix – you want distinct red and white swirls, not a muddy pink color.
Carefully place the wrapped springform pan into the large roasting pan already positioned in your oven. Gently pour hot water into the roasting pan until it reaches halfway up the sides of the springform pan. This water bath (also called a bain-marie) creates gentle, even heat that prevents cracks and ensures creamy texture throughout.
Bake for 70-85 minutes. The cheesecake is done when the edges are set but the center still jiggles slightly when you gently shake the pan – about the diameter of a quarter. The center should register 150-155°F on an instant-read thermometer. It will continue cooking as it cools.
Cooling Process for Oreo Crust Red Velvet Cheesecake
This step is just as important as baking. Turn off the oven and crack the door open about 4 inches. Let the cheesecake cool in the oven for 1 hour. This gradual temperature change prevents the dramatic shrinking that causes cracks.
After an hour, remove the cheesecake from the water bath and remove the foil. Run a thin knife around the edge of the pan to loosen the cheesecake (don’t remove the springform ring yet). Let it cool on a wire rack to room temperature, about 2 hours.
Cover loosely with plastic wrap and refrigerate for at least 8 hours or preferably overnight. This chilling time allows the cheesecake to fully set and the flavors to meld. A properly chilled cheesecake slices cleanly and has the ideal dense, creamy texture.
Pro Tips for Perfect Oreo Crust Red Velvet Cheesecake
Preventing Cracks in Your Oreo Crust Red Velvet Cheesecake
Cracks are the nemesis of beautiful cheesecakes, but they’re entirely preventable. First, ensure all ingredients are truly at room temperature this cannot be overstated. Second, mix on the lowest speed once eggs are added, stopping as soon as ingredients are just combined. Third, use the water bath without exception. Fourth, allow gradual cooling in the oven with the door cracked. Fifth, avoid opening the oven door during baking, as temperature fluctuations cause cracks.
If despite your best efforts a crack appears, don’t panic. You can disguise it beautifully with whipped cream, fresh berries, chocolate shavings, or a dusting of powdered sugar. Your guests will never know, and the flavor remains perfect.
Essential Equipment for Oreo Crust Red Velvet Cheesecake
A 9-inch springform pan with a tight seal is your most important tool. The removable bottom makes unmolding effortless without damaging your creation. Invest in heavy-duty aluminum foil (regular foil tears too easily when wrapping). An electric stand mixer or hand mixer ensures smooth batter without the arm workout. An instant-read thermometer takes the guesswork out of doneness. A large roasting pan that fits your springform pan comfortably is essential for the water bath.
Storage and Serving Guidelines
This Oreo Crust Red Velvet Cheesecake stores beautifully in the refrigerator for up to 5 days when covered tightly with plastic wrap or stored in an airtight container. For the cleanest slices, dip your knife in hot water and wipe it clean between each cut. The heat helps the knife glide through the dense filling without dragging or crumbling the crust.
To freeze, wrap the whole cheesecake (or individual slices) tightly in plastic wrap, then aluminum foil. Freeze for up to 2 months. Thaw overnight in the refrigerator before serving. While the texture may be slightly less creamy than fresh, frozen cheesecake is still absolutely delicious and makes holiday prep incredibly convenient.
Flavor Variations for Oreo Crust Red Velvet Cheesecake
White Chocolate Swirl
Transform your Oreo Crust Red Velvet Cheesecake into an even more decadent treat by melting 4 ounces of white chocolate and swirling it into the plain cheesecake batter before dolloping it over the red velvet layer. The white chocolate adds a subtle sweetness and extra richness that pairs beautifully with the cocoa notes. Let the melted chocolate cool for 5 minutes before mixing to prevent it from seizing.
Peppermint Chocolate Version
For a festive holiday twist, replace the vanilla extract with peppermint extract (use just 1 teaspoon as it’s quite potent). Crush 8-10 peppermint candies and fold them into the Oreo crust mixture before pressing into the pan. Top the finished cheesecake with additional crushed peppermints and chocolate shavings. This variation tastes like Christmas in cheesecake form and looks absolutely stunning.
Chocolate Ganache Topping
Skip the swirled effect entirely and make a single-layer red velvet cheesecake, then top with chocolate ganache. Heat ½ cup heavy cream until just simmering, pour over 6 ounces chopped dark chocolate, and let sit for 2 minutes before stirring until smooth. Let the ganache cool for 10 minutes, then pour over your chilled cheesecake, spreading to the edges. Refrigerate for 30 minutes until set.
Cheesecake Variation Comparison Table
| Variation | Key Addition | Best For | Difficulty Level | Flavor Profile |
|---|---|---|---|---|
| Classic Swirl | Red velvet & plain layers | Traditional holiday dessert | Beginner | Balanced chocolate-vanilla |
| White Chocolate | Melted white chocolate | Chocolate lovers | Intermediate | Rich and sweet |
| Peppermint | Peppermint extract, crushed candies | Winter celebrations | Beginner | Refreshing and festive |
| Chocolate Ganache | Dark chocolate topping | Elegant dinner parties | Intermediate | Intensely chocolatey |
| Cream Cheese Frosting | Traditional frosting layer | Red velvet purists | Advanced | Authentic red velvet |
Serving Suggestions for Oreo Crust Red Velvet Cheesecake
This Oreo Crust Red Velvet Cheesecake shines as the centerpiece of any dessert table, but thoughtful presentation takes it from delicious to unforgettable. Serve slices on white dessert plates to make the crimson swirls pop visually. A small dollop of freshly whipped cream on the side adds lightness without competing with the rich cheesecake.
For an elegant Christmas presentation, dust the top lightly with powdered sugar just before serving to create a “snowy” effect. Add a few fresh raspberries or strawberries on top for color contrast and a touch of tartness that cuts through the richness. A sprig of fresh mint adds a professional bakery touch.
Olivia, our food stylist, taught me that height creates drama. Serve generous slices and consider garnishing with chocolate curls made by running a vegetable peeler along the edge of a chocolate bar at room temperature. These curls catch the light beautifully and signal to guests that this is a special occasion dessert.
Coffee is the ideal beverage pairing the slight bitterness balances the sweetness perfectly. A rich espresso or cappuccino complements the chocolate notes while cleansing the palate between bites. For non-coffee drinkers, cold milk or hot chocolate work wonderfully. If serving at an adult gathering, a dessert cocktail like an espresso martini or Irish coffee creates a memorable finish to the meal.
FAQs About Oreo Crust Red Velvet Cheesecake
Can I make Oreo Crust Red Velvet Cheesecake without a water bath?
While technically possible, I strongly advise against it. The water bath creates gentle, even heat that prevents the edges from overcooking while the center sets properly. Without it, you’ll likely end up with overdone edges, an underdone center, and surface cracks. If you absolutely must skip it, reduce oven temperature to 300°F and expect a slightly different texture. The water bath takes minimal extra effort for dramatically better results.
How do I know when my Oreo Crust Red Velvet Cheesecake is done?
The cheesecake is perfectly baked when the edges are set and puffed slightly, but the center still jiggles like gelatin when you gently shake the pan. The jiggle should be about the size of a quarter in the very center. An instant-read thermometer inserted into the center should read 150-155°F. It will seem underdone, but it continues cooking during the cooling process and will set completely during refrigeration.
Why did my Oreo Crust Red Velvet Cheesecake crack?
Cracks typically result from one of five issues: ingredients weren’t at room temperature, you overmixed after adding eggs, you baked without a water bath, the oven temperature was too high, or you cooled the cheesecake too quickly. The most common culprit is overmixing, which incorporates excess air that expands during baking and contracts during cooling, causing cracks. Mix on low speed and stop as soon as ingredients are combined.
Can I use a different crust for this Red Velvet Cheesecake?
Absolutely! While the Oreo Crust Red Velvet Cheesecake combination is spectacular, you can substitute graham cracker crust (2 cups crumbs plus 6 tablespoons melted butter), chocolate graham crackers, Nilla wafers, or even gingersnap cookies for a spicy kick. Each crust brings its own flavor personality. Maintain the same ratio of crumbs to butter for proper texture.
How far in advance can I make Oreo Crust Red Velvet Cheesecake?
This cheesecake is actually better when made ahead! Prepare it 1-3 days before serving to allow flavors to develop and the texture to fully set. The cheesecake needs at least 8 hours of refrigeration anyway, so planning ahead is built into the recipe. Cover it well with plastic wrap to prevent it from absorbing refrigerator odors. Add any garnishes like whipped cream or berries just before serving to keep them fresh.
Can I make mini Oreo Crust Red Velvet Cheesecakes?
Yes! Use a muffin tin lined with paper liners or spray a mini cheesecake pan generously. Press about 1 tablespoon of Oreo crust mixture into each cup. Reduce baking time to 18-22 minutes – they’re done when the centers barely jiggle. Mini cheesecakes cool faster (about 1 hour at room temperature) and are perfect for parties or portion control. This recipe makes approximately 24 mini cheesecakes.
What if I don’t have gel food coloring for my Red Velvet Cheesecake?
Gel food coloring is strongly preferred because it provides vibrant color without adding excess liquid. If you only have liquid food coloring, you’ll need significantly more (potentially 2-3 tablespoons) to achieve true red, and this extra liquid may slightly affect texture. The cheesecake will still taste delicious but may be softer and less vibrant. Natural red coloring from beet powder creates a more subtle, brownish-red hue rather than bright red.
Is Oreo Crust Red Velvet Cheesecake safe during pregnancy?
This cheesecake is safe for pregnant women as long as it’s fully baked and properly refrigerated. The eggs are cooked to a safe temperature (above 160°F when you account for carryover cooking), and the cream cheese is pasteurized. Ensure the cheesecake reaches the proper internal temperature during baking and hasn’t been left at room temperature for more than 2 hours. When in doubt, consult your healthcare provider about specific dietary concerns.
Conclusion
This Oreo Crust Red Velvet Cheesecake has earned its place as our most-requested holiday dessert, and for good reason. It delivers show-stopping beauty, luxurious texture, and crowd-pleasing flavor without requiring advanced pastry skills. The combination of crunchy chocolate Oreo crust, velvety red velvet swirls, and creamy cheesecake creates a dessert that looks like it came from an upscale bakery but costs a fraction of the price.
Print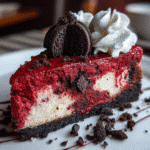
Oreo Crust Red Velvet Cheesecake 5 Secrets to Perfect Holiday Magic
- Total Time: 590
- Yield: 12 1x
- Diet: Vegetarian
Description
This stunning Oreo Crust Red Velvet Cheesecake combines the best of both worlds: a crunchy chocolate Oreo cookie crust topped with swirled red velvet and cream cheese filling. Perfect for Christmas, Valentine’s Day, or any special celebration, this show-stopping dessert looks like it came from a bakery but is surprisingly easy to make at home. The creamy texture and festive colors will impress every guest.
Ingredients
OREO CRUST:
24 Oreo cookies (about 2 cups crushed)
5 tablespoons unsalted butter, melted
Pinch of salt
RED VELVET CHEESECAKE FILLING:
32 ounces (4 blocks) cream cheese, room temperature
1¼ cups granulated sugar
1 cup sour cream, room temperature
4 large eggs, room temperature
2 teaspoons pure vanilla extract
3 tablespoons unsweetened cocoa powder
1 tablespoon red gel food coloring
¼ teaspoon salt
OPTIONAL TOPPINGS:
Whipped cream
Fresh raspberries or strawberries
Powdered sugar for dusting
Chocolate shavings
Instructions
1. Preheat oven to 325°F (163°C). Wrap the outside of a 9-inch springform pan with two layers of heavy-duty aluminum foil extending up the sides. Spray the inside with nonstick spray.
2. Place Oreo cookies in a food processor and pulse until fine crumbs form. Mix crumbs with melted butter and pinch of salt until mixture resembles wet sand. Press firmly into bottom of prepared pan, extending slightly up sides. Refrigerate while preparing filling.
3. In a large bowl, beat room temperature cream cheese with electric mixer on medium-low for 2-3 minutes until completely smooth. Scrape bowl frequently.
4. Add sugar and beat for 2 minutes until light and fluffy. Add sour cream and vanilla, mixing on low until just combined.
5. Add eggs one at a time, mixing on lowest speed just until each egg is incorporated. Do not overmix.
6. Remove 2 cups of batter and set aside in separate bowl. To remaining batter, add cocoa powder and red gel food coloring. Mix on low until color is uniform and vibrant.
7. Pour red velvet batter over chilled Oreo crust. Dollop reserved plain batter on top in 8-10 spots. Use a butter knife to gently swirl batters together in figure-eight motions.
8. Place wrapped springform pan in a large roasting pan. Place roasting pan in oven, then carefully pour hot water into roasting pan until it reaches halfway up sides of springform pan.
9. Bake 70-85 minutes until edges are set but center jiggles slightly (about quarter-sized). Internal temperature should reach 150-155°F.
10. Turn off oven and crack door open 4 inches. Let cheesecake cool in oven for 1 hour.
11. Remove from water bath and foil. Run thin knife around edge. Cool on wire rack to room temperature (about 2 hours).
12. Cover with plastic wrap and refrigerate at least 8 hours or overnight before serving.
13. To serve, remove springform ring. Slice with a hot, clean knife. Garnish with whipped cream, berries, or powdered sugar if desired.
Notes
ALL ingredients must be at room temperature (2-3 hours on counter) for smooth, lump-free batter.
Do not substitute liquid food coloring for gel – it won’t produce vibrant red and adds too much liquid.
The water bath (bain-marie) is essential for preventing cracks and ensuring creamy texture.
Cheesecake is done when center jiggles slightly – it continues cooking during cooling.
For cleanest slices, dip knife in hot water and wipe clean between cuts.
Store covered in refrigerator for up to 5 days. Freeze wrapped tightly for up to 2 months.
If cracks appear, disguise with toppings – flavor is unaffected.
Make 1-3 days ahead for best flavor and easiest entertaining.
- Prep Time: 30
- Cook Time: 80
- Category: Dessert
- Method: Baking
- Cuisine: American
Nutrition
- Serving Size: 1
- Calories: 485
- Sugar: 32g
- Sodium: 340mg
- Fat: 32g
- Saturated Fat: 18g
- Unsaturated Fat: 12g
- Trans Fat: 0g
- Carbohydrates: 42g
- Fiber: 1g
- Protein: 8g
- Cholesterol: 145mg
Keywords: oreo crust red velvet cheesecake, red velvet cheesecake, christmas cheesecake, holiday dessert, oreo cheesecake