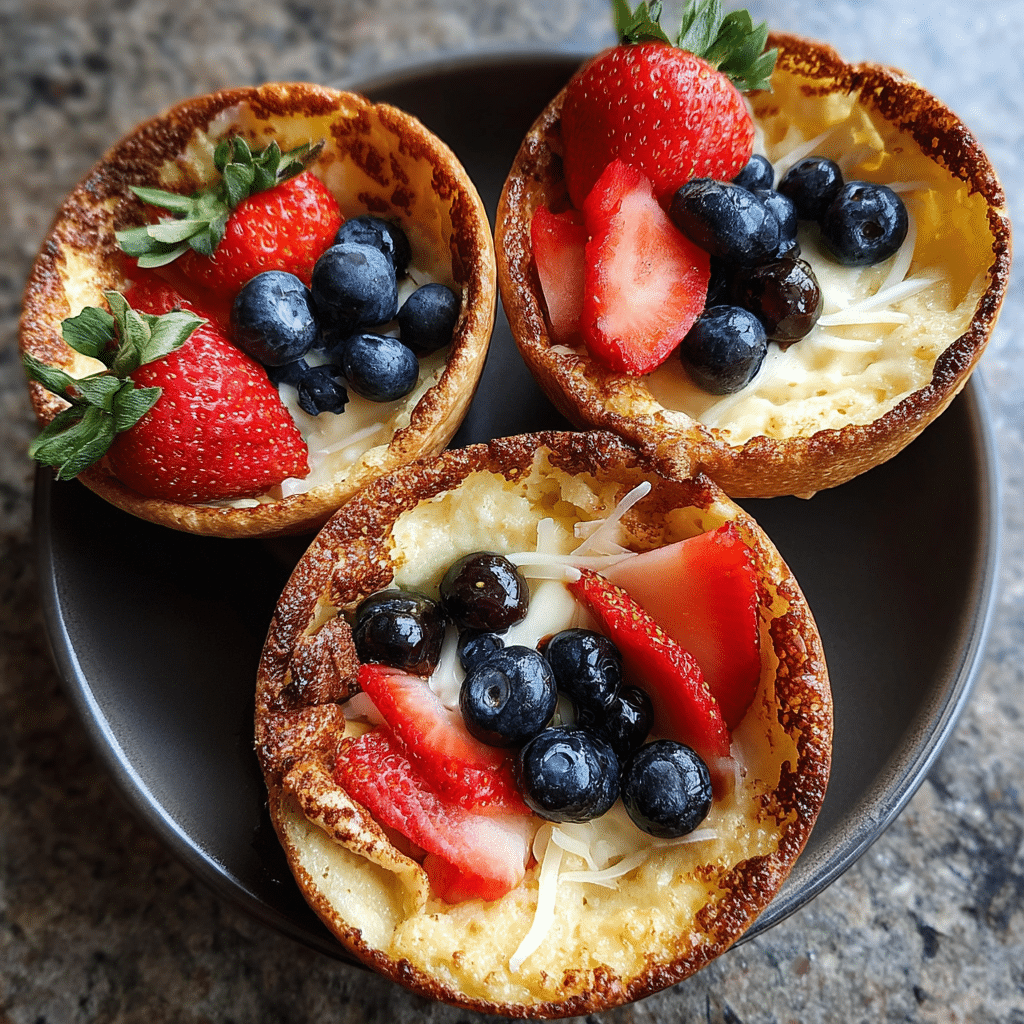
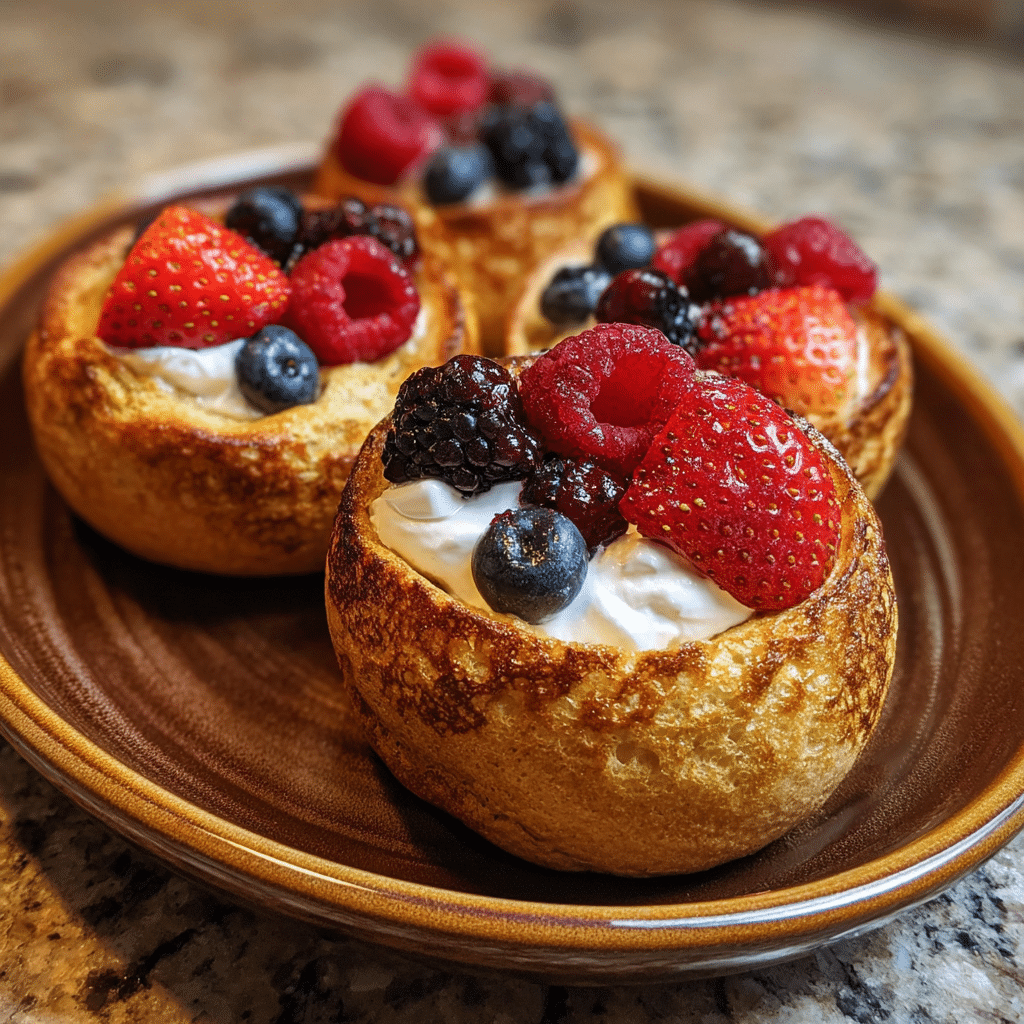
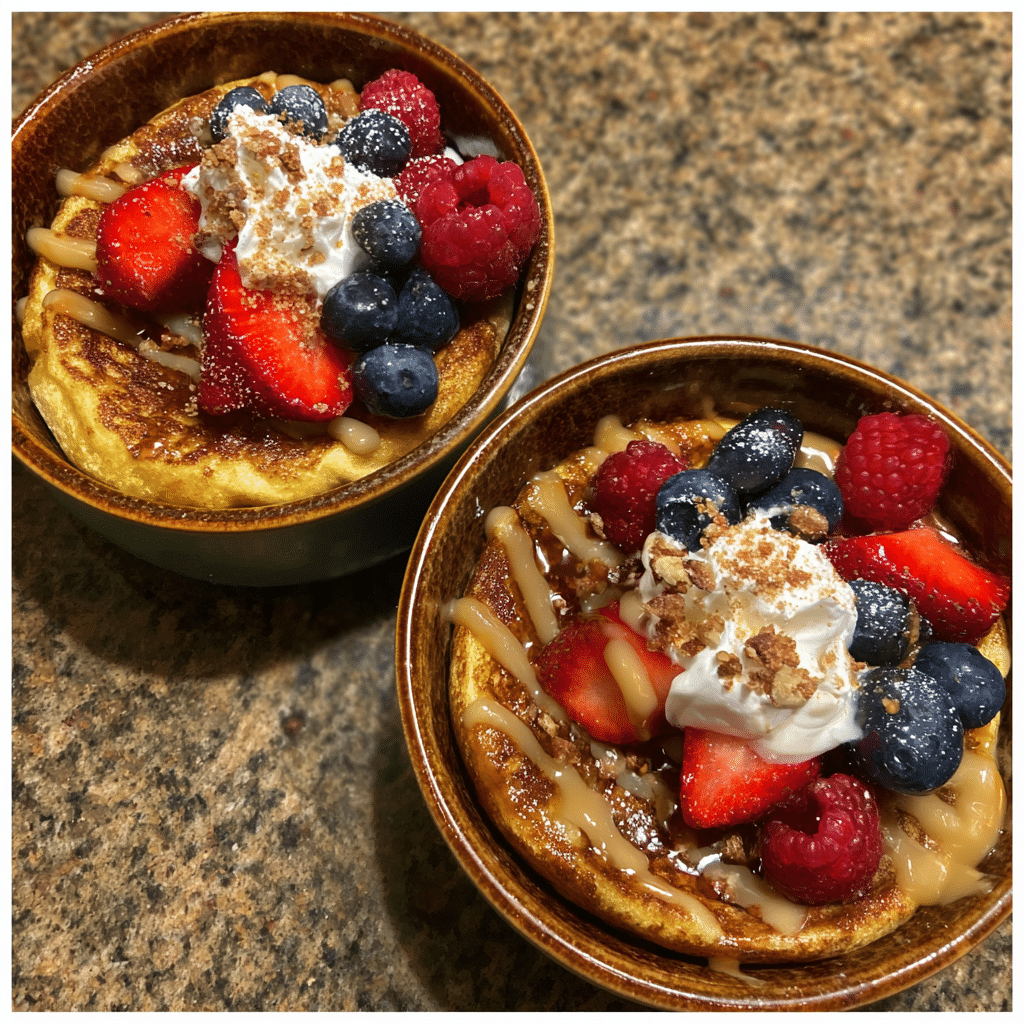
Tired of standing over a hot griddle flipping pancakes one at a time while everyone else is eating? Baked Protein Pancake Bowls solve that problem brilliantly fluffy, protein-packed pancake batter baked in muffin tins, creating perfectly portioned breakfast bowls that cook all at once. Fill them with fresh fruit, nut butter, or yogurt for a customizable breakfast that tastes like a treat but fuels you like a champion.
Hi there, I’m Simon, and I’ve learned that mornings should be enjoyed, not survived. Growing up, my grandmother would make elaborate breakfasts, but modern life doesn’t always allow for that luxury. When my team and I set out to create the perfect make-ahead breakfast, we wanted something that combined nutrition with nostalgia. After Megan’s genius suggestion to bake pancake batter in muffin tins (inspired by her muffin expertise), Jackson’s input on protein ratios for sustained energy, and Olivia’s beautiful styling of the finished bowls, we created something that’s become a Sunday meal prep staple in our kitchens.
In this comprehensive guide, you’ll discover why these protein pancake bowls are revolutionary, how to choose quality ingredients and protein powder, foolproof step-by-step baking instructions, pro tips for perfect texture every time, creative flavor variations for endless variety, and answers to all your breakfast questions. Whether you’re an athlete, busy parent, or just someone who wants better breakfasts, this recipe delivers.
Why This Baked Protein Pancake Bowls Recipe Works
These innovative breakfast bowls have transformed morning routines for thousands of people, and here’s why they’re so effective:
- Hands-off cooking – Mix once, bake once, and you’ve got 12 perfect portions with zero flipping required
- Meal prep champion – Make on Sunday, eat all week; they refrigerate beautifully for up to 5 days
- Protein-packed power – Each bowl delivers 12-15g of protein to keep you satisfied until lunch
- Portion control built-in – Muffin tins create consistent serving sizes, perfect for tracking macros
- Endlessly customizable – Change flavors, fillings, and toppings to never get bored
- Kid-approved – The bowl shape makes them fun to eat and easy to hold for little hands
- Time-efficient – Ready in 25 minutes versus standing at the stove for 45 minutes
The magic is in the ratio of protein powder to flour, which creates pancakes that are fluffy and satisfying without being heavy or chalky. The baked-in bowl shape isn’t just cute—it’s functional, creating the perfect vessel for toppings while keeping everything mess-free.
Choosing the Right Ingredients for Baked Protein Pancake Bowls
Quality ingredients make the difference between protein pancakes that taste like cardboard and ones you’ll actually crave.
Best Protein Powder for This Recipe
Whey protein isolate is my top choice. It has a neutral flavor that blends seamlessly into pancake batter without the chalky texture some proteins create. It also provides the cleanest protein source with minimal carbs and fat.
Casein protein works beautifully too and creates an even fluffier texture because it absorbs more liquid. Casein digests slower, providing sustained energy throughout the morning.
Plant-based proteins (pea, brown rice, hemp) work well but may require slight adjustments. Plant proteins tend to absorb more moisture, so you might need to add 2-3 tablespoons extra milk to achieve proper batter consistency.
Buying Tips for Protein Powder
Look for protein powders with minimal ingredients the fewer additives and fillers, the better. Check that protein content is at least 20g per scoop.
Flavor matters: Vanilla is most versatile and works with both sweet and savory add-ins. Unflavored is ideal if you want complete control. Chocolate protein makes delicious chocolate chip pancake bowls.
Avoid artificial sweeteners if possible: Some create bitter aftertastes when baked. Stevia-sweetened or naturally sweetened options taste better in pancakes.
Buy from reputable brands that third-party test their products. Your protein powder should dissolve smoothly without clumps.
Flour Options
All-purpose flour creates the fluffiest, most traditional pancake texture. It’s what we use in our test kitchen.
Whole wheat flour adds fiber and nutty flavor. Use white whole wheat for milder taste or substitute up to half the all-purpose flour.
Oat flour (or blended oats) makes these naturally gluten-free and adds hearty texture. The flavor is slightly sweeter and more rustic.
Almond flour works but creates denser pancakes. Mix it 50/50 with all-purpose for best results.
Substitutions
Greek yogurt can replace some of the milk for extra protein and tang. Use ½ cup yogurt and reduce milk by ¼ cup.
Mashed banana (½ cup) can replace one egg and adds natural sweetness, though texture will be slightly denser.
Applesauce (¼ cup) works as a low-fat egg substitute, though pancakes won’t be as fluffy.
Ingredients & Prep for Baked Protein Pancake Bowls
Essential Preparation Steps
Protein powder integration is key: Sift or whisk your protein powder with the flour before adding wet ingredients. This prevents clumping and ensures even distribution throughout the batter.
Don’t overmix: Once you combine wet and dry ingredients, stir just until combined. A few lumps are fine overmixing develops gluten and creates tough, dense pancakes.
Let batter rest: After mixing, let the batter sit for 5 minutes. This allows the flour and protein to fully hydrate, resulting in fluffier pancakes.
Prepare muffin tin properly: Generously spray or brush each cup with cooking spray or butter. Even non-stick pans need this for easy removal.
Main Ingredients
For the pancake bowls:
- 1 cup all-purpose flour
- 1 cup vanilla protein powder (about 3-4 scoops, depending on brand)
- 2 tablespoons granulated sugar or honey
- 2 teaspoons baking powder
- ½ teaspoon baking soda
- ½ teaspoon salt
- ½ teaspoon cinnamon
- 2 large eggs
- 1¼ cups milk (dairy or non-dairy)
- ¼ cup plain Greek yogurt
- 2 tablespoons melted coconut oil or butter
- 1 teaspoon vanilla extract
For topping and filling (optional):
- Fresh berries (strawberries, blueberries, raspberries)
- Sliced banana
- Nut butter (almond, peanut, cashew)
- Greek yogurt
- Honey or maple syrup
- Chopped nuts
- Dark chocolate chips
- Coconut flakes
Pantry Staples
Quality baking powder and baking soda ensure proper rise check expiration dates as old leaveners won’t work. Cinnamon adds warmth without being overpowering.
Vanilla extract should be pure, not imitation, for best flavor. Coconut oil or butter adds moisture and richness don’t skip the fat or your pancakes will be dry.
Milk can be any variety you prefer whole milk creates richest texture, but almond, oat, or soy milk all work beautifully.
Step-by-Step Baking Instructions for Baked Protein Pancake Bowls
Pre-Baking Prep for Baked Protein Pancake Bowls
Preheat your oven to 350°F (175°C). Position the rack in the center for even heat distribution.
Generously spray a 12-cup muffin tin with non-stick cooking spray or brush with melted butter. Don’t skip this step or you’ll struggle with removal.
Have all ingredients measured and at room temperature. Cold ingredients don’t incorporate as smoothly and can create lumpy batter.
Mixing Method for Baked Protein Pancake Bowls
In a large mixing bowl, whisk together flour, protein powder, sugar, baking powder, baking soda, salt, and cinnamon. Make sure everything is evenly distributed and there are no protein powder clumps.
In a separate bowl, whisk together eggs, milk, Greek yogurt, melted coconut oil (cooled slightly so it doesn’t scramble the eggs), and vanilla extract until smooth and well combined.
Pour the wet ingredients into the dry ingredients. Using a spatula or wooden spoon, gently fold together just until combined. Don’t overmix a few small lumps are perfectly fine and actually better than overmixed batter.
Let the batter rest for 5 minutes. During this time, the flour hydrates and the leaveners begin activating. You’ll notice the batter thickens slightly and bubbles may form this is perfect.
Baking Method for Baked Protein Pancake Bowls
Using a ¼-cup measuring cup or ice cream scoop, divide batter evenly among the 12 muffin cups. Fill each about ⅔ to ¾ full they’ll puff up during baking but won’t overflow if properly portioned.
Use the back of a spoon to gently press down the center of each portion, creating a shallow well. This helps form the bowl shape and prevents excessive doming.
Bake for 18-22 minutes until the pancake bowls are golden brown on top, spring back when lightly touched, and a toothpick inserted into the side (not center) comes out clean.
The centers will look slightly underdone that’s intentional for the bowl shape. The residual heat will finish cooking them.
Doneness Check for Baked Protein Pancake Bowls
Pancake bowls are done when the edges are golden brown and pulling slightly away from the pan. The tops should spring back when lightly pressed.
Insert a toothpick into the side of a pancake bowl (not the center well) it should come out clean or with just a few moist crumbs.
The internal temperature should read about 190-200°F if using an instant-read thermometer.
Cooling for Baked Protein Pancake Bowls
Let the pancake bowls cool in the muffin tin for 5 minutes. This allows them to set and makes removal easier.
Run a butter knife around the edges of each bowl to loosen, then gently lift out using a spoon or small offset spatula.
Transfer to a wire rack to cool completely if meal prepping, or serve warm immediately with your favorite toppings.
Pro Tips for Perfect Baked Protein Pancake Bowls
Avoiding Dense or Rubbery Texture
Don’t overmix: This is the number one rule for fluffy pancakes. Mix just until you can’t see dry flour anymore—lumps are your friends.
Check your leaveners: Old baking powder or baking soda won’t create proper rise. Test baking powder by adding ½ teaspoon to hot water it should fizz vigorously.
Room temperature ingredients: Cold eggs and milk create dense batter. Let them sit out for 30 minutes before mixing.
Protein powder ratio: Too much protein powder makes chalky, dense pancakes. Stick to a 1:1 ratio with flour for best results.
Avoiding Dry or Crumbly Pancakes
Don’t overbake: Check at 18 minutes. Even 2-3 minutes of overbaking can dry them out significantly.
Include fat: The coconut oil or butter isn’t optional it keeps pancakes moist and tender.
Add Greek yogurt: This adds moisture and protein while keeping things tender.
Store properly: Once cooled, store in an airtight container. Exposed pancakes dry out quickly.
Tool Recommendations
A standard 12-cup muffin tin is essential mini or jumbo sizes won’t work with this recipe’s timing and proportions.
A whisk ensures even mixing without overmixing. An ice cream scoop or ¼-cup measure creates uniform portions.
Silicone muffin liners are optional but make removal foolproof and cleanup even easier.
Storage & Reheating for Baked Protein Pancake Bowls
Refrigerator storage: Cool completely, then store in an airtight container for up to 5 days. Stack with parchment paper between layers to prevent sticking.
Freezer storage: Freeze in a single layer on a baking sheet for 2 hours, then transfer to freezer bags. They keep for up to 3 months.
Reheating: Microwave for 20-30 seconds from refrigerated or 45-60 seconds from frozen. Or reheat in a 300°F oven for 8-10 minutes for crispier edges.
Topping strategy: Add fresh toppings after reheating for best texture and presentation. Pre-topped pancakes can get soggy.
Flavor Variations for Baked Protein Pancake Bowls
Chocolate Lover’s Version
Use chocolate protein powder and add ⅓ cup mini chocolate chips to the batter. Top with sliced strawberries and a drizzle of nut butter for a dessert-worthy breakfast.
Berry Blast
Fold ¾ cup fresh or frozen blueberries into the batter before baking. Use vanilla or berry-flavored protein. Top with more fresh berries and a dollop of vanilla Greek yogurt.
Apple Cinnamon
Add 1 cup finely diced apple and increase cinnamon to 1 teaspoon. Add ¼ teaspoon nutmeg. Top with a sprinkle of granola and a drizzle of almond butter.
Banana Nut
Fold in 1 mashed banana and ½ cup chopped walnuts or pecans. Use vanilla protein. Top with banana slices and a drizzle of honey.
Pumpkin Spice
Replace ¼ cup milk with pumpkin puree. Add 1 teaspoon pumpkin pie spice instead of cinnamon. Perfect for fall mornings.
Savory Option
Omit sugar and use unflavored protein powder. Add ½ cup shredded cheddar cheese, 2 tablespoons chopped chives, and ¼ teaspoon garlic powder. Top with avocado and cherry tomatoes.
Variation Comparison Table
| Variation | Key Additions | Protein Flavor | Best Toppings | Macro Profile |
|---|---|---|---|---|
| Classic Vanilla | Cinnamon | Vanilla | Fresh berries, maple syrup | Balanced |
| Chocolate Chip | Mini chocolate chips | Chocolate | Strawberries, nut butter | Higher fat |
| Blueberry | Fresh blueberries | Vanilla or berry | Greek yogurt, honey | Antioxidant-rich |
| Apple Cinnamon | Diced apple, extra cinnamon | Vanilla | Granola, almond butter | Fiber-rich |
| Banana Nut | Mashed banana, walnuts | Vanilla | Banana slices, honey | Higher calories |
| Pumpkin Spice | Pumpkin puree, spices | Vanilla | Pecans, maple syrup | Vitamin A boost |
| Savory Cheese | Cheddar, chives, garlic | Unflavored | Avocado, eggs, tomatoes | Lower sugar |
Serving Suggestions for Baked Protein Pancake Bowls
These versatile bowls work for multiple meals and occasions beyond just breakfast.
Classic breakfast: Fill with Greek yogurt, top with fresh berries, drizzle with honey, and sprinkle with granola for crunch.
Portable breakfast: Spread nut butter inside the bowl, add banana slices, and eat on the go. The bowl contains everything perfectly.
Post-workout fuel: Fill with cottage cheese and top with fresh fruit for maximum protein and recovery nutrients.
Brunch presentation: Arrange on a platter with various topping options (berries, nuts, seeds, nut butters, yogurt) and let guests customize their own.
Kid-friendly: Let children fill their own bowls with toppings the interactive element makes them more likely to eat breakfast.
Dessert option: Fill with vanilla ice cream or frozen yogurt, top with chocolate chips and whipped cream for a guilt-free dessert.
Meal prep strategy: Make 12 bowls on Sunday. Eat 2 per day throughout the week. Pre-portion toppings in small containers for grab-and-go convenience.
FAQs About Baked Protein Pancake Bowls
Can I use a different type of protein powder? Yes! Whey, casein, and plant-based proteins all work. Plant proteins may need slightly more liquid add 2-3 tablespoons extra milk if batter seems too thick.
Why are my pancake bowls dense? Most likely overmixing or too much protein powder. Mix just until combined, and stick to the 1:1 ratio of protein powder to flour.
Can I make these without protein powder? Yes, replace the protein powder with an equal amount of flour. They’ll be regular pancake bowls still delicious but with less protein (about 5g per bowl instead of 12-15g).
How do I prevent sticking? Generously grease the muffin tin, even if it’s non-stick. Silicone muffin liners virtually guarantee easy removal.
Can I make mini versions? Absolutely! Use a 24-cup mini muffin tin and reduce baking time to 12-15 minutes. Perfect for kids or portion control.
My bowls didn’t form a well in the center. What happened? Make sure to press down the center before baking. Also, don’t overfill the cups ⅔ to ¾ full is ideal.
Are these suitable for meal prep? Yes! They’re specifically designed for meal prep. Store properly and they’ll stay fresh for 5 days refrigerated or 3 months frozen.
Can I double the recipe? Definitely! Mix two batches separately rather than doubling in one bowl (easier to mix thoroughly). Bake in shifts if you don’t have two muffin tins.
What’s the best way to reheat without drying them out? Microwave with a damp paper towel over them, or reheat in a 300°F oven. Don’t overheat—20-30 seconds in the microwave is usually enough.
Are these kid-friendly? Absolutely! Kids love the bowl shape, and you can sneak in nutrition. Let them choose their own toppings for more enthusiasm.
Conclusion
You now have everything you need to revolutionize your breakfast routine with Baked Protein Pancake Bowls. These innovative, protein-packed bowls combine convenience, nutrition, and deliciousness in a way that traditional pancakes simply can’t match.
Print
Baked Protein Pancake Bowls 8 Secrets to Perfect Meal Prep Magic
- Total Time: 30
- Yield: 12 1x
Description
These Baked Protein Pancake Bowls transform traditional pancakes into perfectly portioned, protein-packed breakfast bowls that bake all at once in a muffin tin. No more standing at the griddle flipping individual pancakes! Each bowl delivers 12-15g of protein and creates the perfect vessel for yogurt, fresh fruit, nut butter, or any topping you love. Ideal for meal prep, these fluffy pancake bowls stay fresh for 5 days refrigerated or 3 months frozen. They’re customizable, kid-friendly, and make healthy eating effortless.
Ingredients
1 cup all-purpose flour (can substitute whole wheat or oat flour)
1 cup vanilla protein powder (about 3–4 scoops, depending on brand)
2 tablespoons granulated sugar or honey
2 teaspoons baking powder
½ teaspoon baking soda
½ teaspoon salt
½ teaspoon ground cinnamon
2 large eggs, room temperature
1¼ cups milk (dairy or non-dairy)
¼ cup plain Greek yogurt
2 tablespoons melted coconut oil or butter, slightly cooled
1 teaspoon vanilla extract
OPTIONAL TOPPINGS:
Fresh berries (strawberries, blueberries, raspberries)
Sliced banana
Nut butter (almond, peanut, cashew)
Greek yogurt
Honey or maple syrup
Chopped nuts
Dark chocolate chips
Granola
Instructions
1. Preheat oven to 350°F (175°C). Position rack in center of oven.
2. Generously spray a 12-cup muffin tin with non-stick cooking spray or brush with melted butter, making sure to coat the sides well.
3. In a large mixing bowl, whisk together flour, protein powder, sugar, baking powder, baking soda, salt, and cinnamon until well combined and no clumps remain.
4. In a separate medium bowl, whisk together eggs, milk, Greek yogurt, melted coconut oil (cooled slightly), and vanilla extract until smooth.
5. Pour wet ingredients into dry ingredients. Using a spatula or wooden spoon, gently fold together just until combined. Don’t overmix—a few small lumps are fine. Overmixing creates tough, dense pancakes.
6. Let batter rest for 5 minutes. It will thicken slightly as the flour and protein hydrate.
7. Using a ¼-cup measuring cup or ice cream scoop, divide batter evenly among the 12 muffin cups, filling each about ⅔ to ¾ full.
8. Use the back of a spoon to gently press down the center of each portion, creating a shallow well for toppings.
9. Bake for 18-22 minutes until golden brown on top, edges pull slightly away from pan, and a toothpick inserted into the side comes out clean.
10. Let cool in muffin tin for 5 minutes to set.
11. Run a butter knife around edges to loosen, then gently lift out with a spoon or small offset spatula.
12. Transfer to wire rack to cool completely for meal prep, or serve warm with desired toppings.
Notes
Room temperature ingredients mix more smoothly and create fluffier texture. Let eggs and milk sit out for 30 minutes before mixing.
Don’t overmix the batter. Stir just until you can’t see dry flour—lumps are fine and preferred.
The 1:1 ratio of protein powder to flour is crucial. Too much protein makes chalky, dense pancakes.
Test your baking powder by adding ½ teaspoon to hot water—it should fizz vigorously. Old leaveners won’t work properly.
Whey or casein protein works best. Plant-based proteins may need 2-3 tablespoons extra milk for proper consistency.
Press centers before baking to create the bowl shape and prevent excessive doming.
Check doneness at 18 minutes. Overbaking by even 2-3 minutes creates dry pancakes.
Store cooled pancake bowls in airtight container for up to 5 days refrigerated. Stack with parchment between layers.
Freeze in single layer for 2 hours, then transfer to freezer bags for up to 3 months.
Reheat refrigerated bowls for 20-30 seconds in microwave, or 45-60 seconds from frozen.
Add toppings after reheating for best texture. Pre-topped bowls can get soggy during storage.
Each bowl provides approximately 12-15g protein, depending on protein powder brand used.
- Prep Time: 10
- Cook Time: 20
- Category: Breakfast
- Method: Baking
- Cuisine: American
Nutrition
- Serving Size: 2
- Calories: 180
- Sugar: 6g
- Sodium: 320mg
- Fat: 6g
- Saturated Fat: 3g
- Unsaturated Fat: 2.5g
- Trans Fat: 0g
- Carbohydrates: 18g
- Fiber: 1g
- Protein: 14g
- Cholesterol: 65mg
Keywords: protein pancakes, baked pancakes, meal prep breakfast, protein pancake bowls, healthy breakfast