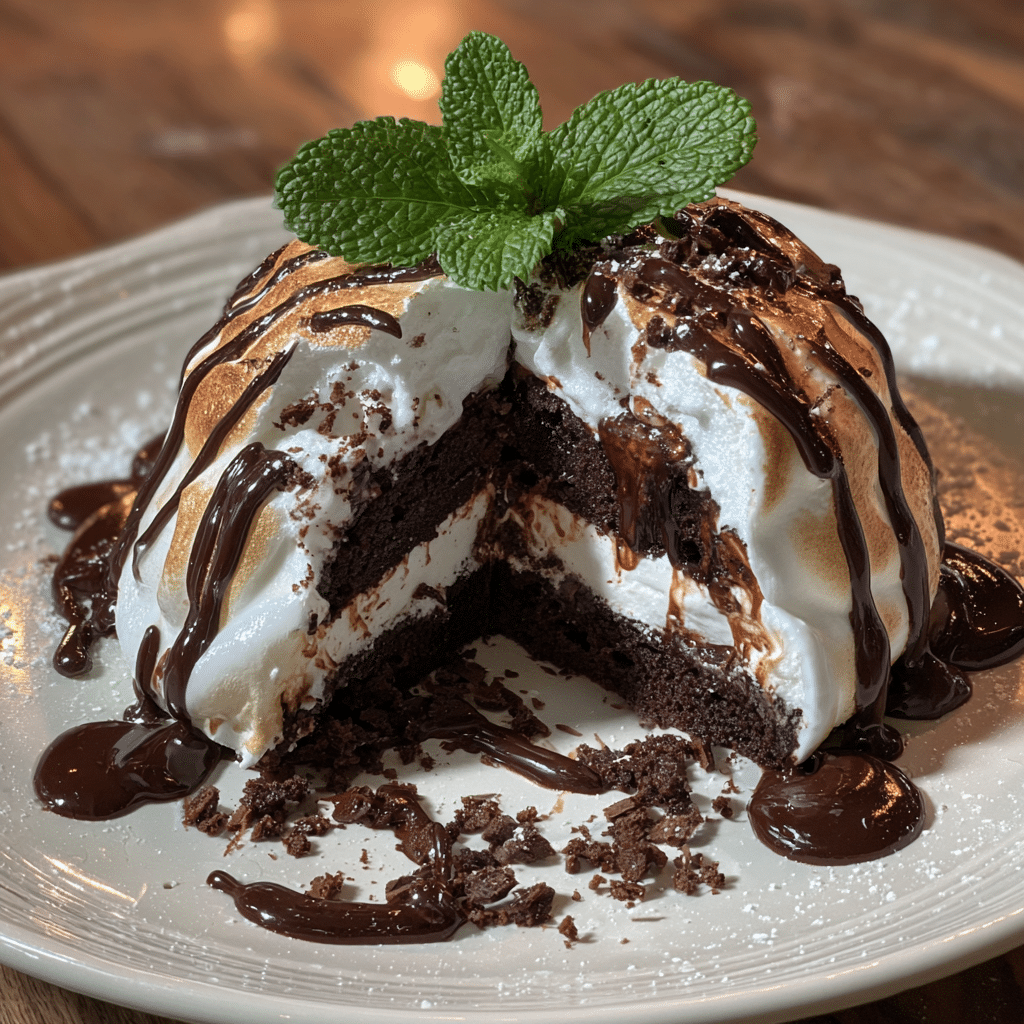
Chocolate Brownie Peppermint Baked Alaska is the answer to every home cook’s fear of serving boring desserts at holiday gatherings. Tired of spending hours on complicated desserts that collapse, melt, or simply don’t impress? This stunning three layer masterpiece combines fudgy brownie, cool peppermint ice cream, and torched meringue into a show stopping centerpiece that looks like it came from a fancy restaurant but is surprisingly achievable in your own kitchen.
I’m Simon, and this Chocolate Brownie Peppermint Baked Alaska was born from pure necessity and a dash of panic. Last December, Megan announced we were hosting a formal holiday dinner party with twelve guests, and I wanted to create something truly unforgettable. Baked Alaska had always intimidated me the science, the timing, the flambé factor but Megan convinced me we could crack the code together. After five test runs (three of which ended in melted disasters that we ate anyway), we finally mastered the technique. The secret? It’s all about organization and understanding that baked Alaska is more about assembly than actual baking skill. Jackson helped us perfect the brownie base, insisting it needed to be dense enough to support the ice cream but still fudgy. Olivia captured the moment we torched our first successful meringue, and honestly, the dramatic flames made all the failed attempts worth it.
This isn’t just another holiday dessert recipe. This Chocolate Brownie Peppermint Baked Alaska delivers that “wow” factor you’ve been searching for the contrast of warm, toasted meringue against frozen ice cream, the richness of chocolate against refreshing peppermint, and that theatrical presentation that makes guests gasp. In this guide, you’ll master every component: baking the perfect brownie base, choosing and shaping ice cream, creating billowy Italian meringue, and executing the final torch (or broiler) technique that brings it all together in a spectacular finish.
Why This Chocolate Brownie Peppermint Baked Alaska Recipe Works
This Chocolate Brownie Peppermint Baked Alaska isn’t your average complicated dessert. Here’s exactly why it succeeds where other elaborate desserts fall short:
- Make-ahead friendly with most components prepared 1-3 days in advance, leaving only 10 minutes of final assembly before serving
- Forgiving technique that uses stable Italian meringue instead of finicky French meringue, meaning no weeping or collapsing
- Dense brownie base acts as insulation, keeping ice cream frozen even during the meringue torching process
- Visual drama with minimal actual difficulty guests think you’re a pastry genius, but the recipe is straightforward
- Customizable flavors so you can swap ice cream flavors or brownie bases to match any occasion or preference
- Serves a crowd with one recipe feeding 10-12 people, making it perfect for holiday parties and celebrations
The magic lies in understanding the science: the meringue acts as insulation (egg whites are terrible heat conductors), the brownie provides a stable foundation, and working with fully frozen ice cream prevents melting during assembly. Master these principles, and you’ll never fear baked Alaska again.
Choosing the Right Components for Chocolate Brownie Peppermint Baked Alaska
Quality ingredients and smart selections make this Chocolate Brownie Peppermint Baked Alaska achievable and delicious.
Best Brownie Base for This Recipe
You need a dense, fudgy brownie not cakey for proper structural support. The brownie must be sturdy enough to hold the weight of ice cream and not crumble when sliced, yet still taste rich and chocolatey. Underbaking slightly (removing when a toothpick has moist crumbs, not wet batter) gives you that perfect fudgy texture.
Box brownie mixes work surprisingly well for this application. Duncan Hines Chewy Fudge or Ghirardelli Double Chocolate create excellent bases with minimal effort. If using a mix, bake in a 9-inch springform pan rather than the package’s recommended size for the right thickness.
Homemade brownies give you control over chocolate intensity and texture. Use a recipe that calls for melted chocolate (not just cocoa powder) for maximum richness. The brownie should be about 1 inch thick after baking.
Ice Cream Selection Tips
Peppermint ice cream is traditional and spectacular with chocolate. Look for brands with real peppermint flavor and visible peppermint pieces or swirls. Häagen-Dazs, Tillamook, or Turkey Hill make excellent peppermint ice cream during holiday season.
Buy premium ice cream with higher fat content (14% or more). It’s denser, scoops easier when frozen solid, and melts more slowly during assembly. Cheap ice cream has too much air, making it difficult to shape and more prone to melting.
You’ll need a full half-gallon (2 quarts) for a 9-inch baked Alaska that serves 10-12 people. The ice cream should be rock-solid frozen, straight from the freezer, during assembly.
Component Substitutions
Brownie alternatives: Use chocolate chip cookie dough pressed into a pan and baked until just set, chocolate cake (but make it extra dense), or even store-bought brownies from a bakery if you’re short on time.
Ice cream flavor swaps: Mint chocolate chip, vanilla bean with crushed candy canes folded in, chocolate ice cream for double chocolate intensity, or coffee ice cream for a sophisticated mocha-mint combination.
Meringue variations: Italian meringue (cooked sugar syrup) is most stable and recommended. Swiss meringue (eggs and sugar heated together) works but is less stable. Never use French meringue (raw eggs and sugar) it weeps and collapses too easily.
Ingredients & Prep for Chocolate Brownie Peppermint Baked Alaska
Proper preparation and organization are crucial for successful Chocolate Brownie Peppermint Baked Alaska assembly.
Brownie Base Components
For homemade fudgy brownies:
- 1 cup (2 sticks) unsalted butter
- 8 ounces dark chocolate, chopped (60-70% cacao)
- 1 1/2 cups granulated sugar
- 4 large eggs, room temperature
- 1 teaspoon vanilla extract
- 1 teaspoon instant espresso powder (enhances chocolate)
- 3/4 cup all-purpose flour
- 1/3 cup unsweetened cocoa powder
- 1/2 teaspoon salt
- 1/2 cup mini chocolate chips (optional, for extra richness)
Ice Cream Layer Essentials
- 2 quarts (half gallon) premium peppermint ice cream
- Plastic wrap for shaping
- 9-inch round cake pan or bowl for molding
Italian Meringue Ingredients
- 4 large egg whites, room temperature
- 1 cup granulated sugar
- 1/4 cup water
- 1/4 teaspoon cream of tartar
- 1 teaspoon vanilla extract
- Pinch of salt
Tools and Equipment
You’ll need: 9-inch springform pan (for brownie), stand mixer or hand mixer with whisk attachment, candy thermometer, kitchen torch (or broiler), offset spatula, large bowl for ice cream molding, parchment paper, and freezer space for a 9-inch dessert.
Step-by-Step Instructions for Chocolate Brownie Peppermint Baked Alaska

This multi-day process is broken into manageable steps. Don’t be intimidated by the length each component is simple on its own.
Day 1: Baking the Brownie Base for Chocolate Brownie Peppermint Baked Alaska
Preheat your oven to 350°F (175°C). Line a 9-inch springform pan with parchment paper, leaving overhang on the sides for easy removal. Grease the parchment and pan sides thoroughly.
Melt butter and chopped chocolate together in a double boiler or microwave (30-second intervals, stirring between). Stir until completely smooth. Let cool for 5 minutes.
Whisk sugar into the chocolate mixture until well combined. Add eggs one at a time, whisking vigorously after each addition until glossy and smooth. Stir in vanilla and espresso powder.
In a separate bowl, whisk together flour, cocoa powder, and salt. Fold dry ingredients into chocolate mixture using a spatula, mixing just until no dry streaks remain. Fold in chocolate chips if using.
Pour batter into prepared springform pan, smoothing the top with an offset spatula. Bake for 28-32 minutes. The brownie is ready when a toothpick inserted 2 inches from the edge comes out with moist crumbs (the center will still look slightly underdone—this is correct).
Cool in the pan for 15 minutes, then run a knife around the edges and remove the springform ring. Cool completely on a wire rack, then wrap tightly in plastic wrap and refrigerate overnight. This firms up the brownie, making it easier to work with during assembly.
Day 1-2: Shaping the Ice Cream for Chocolate Brownie Peppermint Baked Alaska
Line a 9-inch round cake pan or bowl (slightly smaller than your brownie base) with plastic wrap, leaving plenty of overhang. This creates your ice cream mold.
Remove ice cream from freezer and let sit at room temperature for 5-7 minutes until just soft enough to scoop but still very firm. Working quickly, scoop ice cream into the lined pan, pressing down firmly to eliminate air pockets. Use the back of a spoon or offset spatula to smooth the top into an even dome shape.
The ice cream layer should be about 2-3 inches thick at the center, doming slightly. Fold the plastic wrap over the top and freeze solid for at least 6 hours, preferably overnight. This ice cream dome needs to be rock-hard for successful assembly.
Day 2-3: Making Italian Meringue for Chocolate Brownie Peppermint Baked Alaska
This step happens right before serving (within 30 minutes of torching and serving the dessert). Do not make meringue in advance.
Separate your eggs, ensuring absolutely no yolk gets into the whites (even a speck of fat will prevent proper whipping). Bring egg whites to room temperature, about 30 minutes.
In a small saucepan, combine sugar and water. Attach a candy thermometer and heat over medium-high heat without stirring. Let the mixture come to a boil and continue cooking until it reaches 240°F (soft-ball stage). This takes about 7-10 minutes.
Meanwhile, when the sugar syrup reaches about 230°F, start whipping your egg whites. In a stand mixer fitted with whisk attachment (or using a hand mixer), beat egg whites and cream of tartar on medium speed until foamy. Increase to high speed and beat until soft peaks form.
When the sugar syrup reaches exactly 240°F, remove from heat immediately. With the mixer running on medium low speed, slowly pour the hot syrup down the side of the bowl (not directly onto the whisk it will splatter). Once all syrup is added, increase speed to high and whip for 7-8 minutes until the meringue is glossy, stiff peaks form, and the bowl feels cool to the touch.
Beat in vanilla and salt. Your Italian meringue should be thick, glossy, and hold very stiff peaks. Use immediately.
Final Assembly of Chocolate Brownie Peppermint Baked Alaska
Place your chilled brownie on a serving platter or cake stand. If needed, trim the brownie to create an even, flat surface.
Remove ice cream dome from freezer. Unwrap and quickly invert the ice cream onto the center of the brownie base. Peel away the plastic wrap. Work fast you have maybe 2-3 minutes before melting becomes an issue.
Using an offset spatula or large spoon, quickly cover the entire ice cream dome and brownie sides with Italian meringue. Create swoops, peaks, and swirls for visual drama. Make sure there are absolutely no gaps the meringue completely seals in the ice cream. This insulation is crucial.
Torching and Serving Chocolate Brownie Peppermint Baked Alaska
Kitchen torch method (preferred): Hold a kitchen torch 3-4 inches from the meringue surface. Move the flame continuously in circular motions, toasting the meringue peaks until golden brown all over. This takes 2-3 minutes of careful torching. The movement prevents burning while creating beautiful caramelization.
Broiler method (alternative): Place the assembled baked Alaska on a baking sheet. Position an oven rack 4-5 inches from the broiler element. Preheat broiler to high. Broil for 1-2 minutes, watching constantly and rotating the pan for even browning. The meringue should turn golden with some dark spots. Remove immediately when toasted—this happens FAST.
Serve immediately after torching. The meringue will be warm, the ice cream will stay frozen, and the contrast is spectacular. Use a sharp knife dipped in hot water to slice clean portions.
Pro Tips for Perfect Chocolate Brownie Peppermint Baked Alaska
After making this Chocolate Brownie Peppermint Baked Alaska multiple times, here are the secrets that guarantee success.
Avoiding Melted or Messy Chocolate Brownie Peppermint Baked Alaska
The ice cream must be completely frozen solid not just firm, but rock-hard. If it gives at all when you press on it, freeze longer. Soft ice cream will melt during assembly and create a soupy mess.
Work in stages with plenty of freezer time between steps. Don’t try to do everything in one day. The multi-day approach gives each component time to set properly.
Completely seal the ice cream with meringue. Any exposed ice cream will melt when torched. Check for gaps by viewing from all angles before torching.
If your ice cream starts melting during assembly, immediately return everything to the freezer for 30 minutes before continuing.
Tool Recommendations for Chocolate Brownie Peppermint Baked Alaska
A kitchen torch is worth the investment for baked Alaska. They cost $15-30 and make torching controllable and beautiful. Crème brûlée torches work but take longer. The broiler works but requires extreme vigilance to prevent burning.
A stand mixer makes Italian meringue much easier than a hand mixer, as you need one hand free to pour hot syrup. If using a hand mixer, recruit a helper.
A candy thermometer is essential for Italian meringue success. Digital instant-read thermometers don’t work well for boiling sugar you need a traditional clip-on candy thermometer.
An offset spatula makes spreading meringue smooth and creating swoops easy. A large spoon works in a pinch but doesn’t give the same control.
Storage Guidelines for Chocolate Brownie Peppermint Baked Alaska
The assembled (but un-torched) baked Alaska can be frozen for up to 2 days before serving. Once meringue is applied and the dessert is fully assembled, cover loosely with plastic wrap (don’t let it touch the meringue) and freeze. Torch right before serving.
Leftover portions (already torched) can be returned to the freezer, but the meringue will weep slightly and lose its texture. They’re still delicious but less visually stunning. Consume within 2 days.
The brownie base alone keeps wrapped in the refrigerator for up to 5 days or frozen for 2 months. The shaped ice cream dome keeps frozen for up to 1 month.
Flavor Variations for Chocolate Brownie Peppermint Baked Alaska
This Chocolate Brownie Peppermint Baked Alaska template works with countless flavor combinations. Here are proven winners.
Triple Chocolate Baked Alaska
Use a chocolate brownie base, chocolate ice cream, and add 1/4 cup cocoa powder to the Italian meringue for chocolate meringue. Garnish with chocolate shavings and a drizzle of chocolate sauce after torching. This is chocolate lover’s heaven—intense, rich, and decadent.
Vanilla Bean and Berry Baked Alaska
Swap the brownie for vanilla or almond cake (pound cake works beautifully). Use vanilla bean ice cream with fresh berries folded in. The classic meringue pairs perfectly with this lighter flavor profile. Garnish with fresh berries and a dusting of powdered sugar.
Coffee Toffee Baked Alaska
Keep the chocolate brownie base but use coffee or butter pecan ice cream. Fold crushed toffee pieces into the Italian meringue before spreading. The combination of chocolate, coffee, and caramelized toffee creates sophisticated depth.
S’mores Baked Alaska
Use graham cracker crust instead of brownie (press graham crumbs into the springform pan and bake 10 minutes). Fill with chocolate and vanilla swirled ice cream with mini marshmallows folded in. After torching the meringue, it tastes exactly like s’mores with that campfire flavor.
Flavor Combination Table
| Variation | Base | Ice Cream | Special Touches | Best For |
|---|---|---|---|---|
| Classic Peppermint | Chocolate brownie | Peppermint | Crushed candy canes | Holiday parties |
| Triple Chocolate | Chocolate brownie | Chocolate | Chocolate meringue, shavings | Chocolate lovers |
| Vanilla Berry | Vanilla cake | Vanilla with berries | Fresh berry garnish | Summer celebrations |
| Coffee Toffee | Chocolate brownie | Coffee | Crushed toffee pieces | Sophisticated dinners |
| S’mores | Graham crust | Chocolate-vanilla swirl | Mini marshmallows | Kids’ parties, casual |
| Neapolitan | Vanilla cake | Strawberry-chocolate-vanilla | Striped presentation | Classic appeal |
| Salted Caramel | Chocolate brownie | Salted caramel | Caramel drizzle | Trendy gatherings |
| Lemon Blueberry | Lemon cake | Lemon | Fresh blueberries | Spring/summer events |
Serving Suggestions for Chocolate Brownie Peppermint Baked Alaska
This Chocolate Brownie Peppermint Baked Alaska is a showstopper that deserves the right presentation and accompaniments.
Plating and Presentation
Serve on a beautiful cake stand or white platter that contrasts with the golden meringue. Slice with a sharp chef’s knife dipped in hot water, wiping clean between cuts for pristine slices.
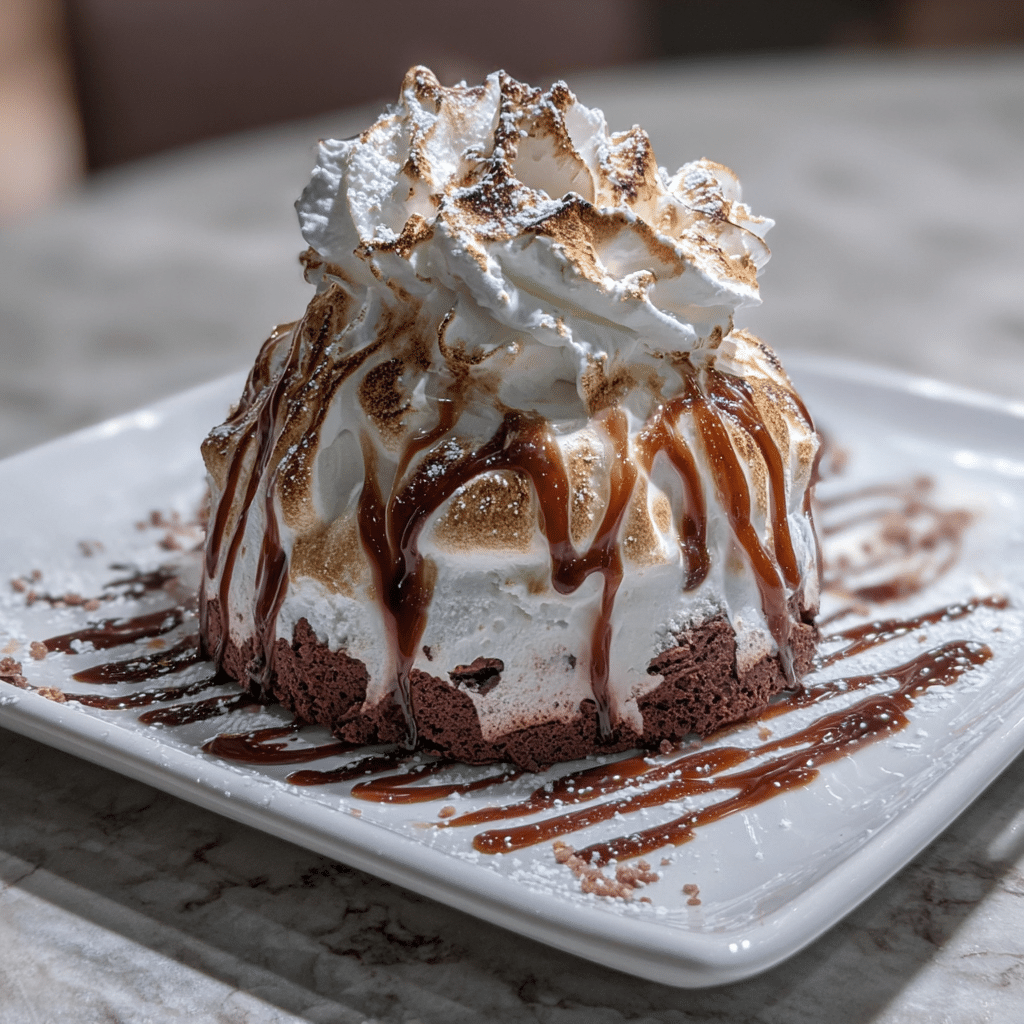
Drizzle each plate with chocolate sauce or caramel before placing the slice. Add a sprig of fresh mint and a few whole candy canes as garnish. Dust lightly with cocoa powder or powdered sugar for an elegant finish.
For maximum drama, torch the dessert tableside in front of guests. Dim the lights slightly so everyone can see the flame caramelizing the meringue. The theatrical element makes the dessert even more memorable.
Perfect Pairings
This rich dessert pairs beautifully with hot coffee, espresso, or peppermint tea. The hot beverage cuts through the sweetness and complements the cold ice cream.
Serve smaller slices this is a rich dessert. Pair with fresh berries or a light fruit salad on the side for contrast and to cleanse the palate between bites.
For elegant dinner parties, serve alongside chocolate-dipped strawberries, candied pecans, or delicate cookies like pizzelles or tuiles.
Occasion Ideas
Christmas dinner finale: This is THE showstopper for Christmas. Torch it at the table with candles lit and watch jaws drop.
New Year’s Eve celebration: Ring in the new year with this impressive dessert that feels special and festive.
Winter birthday cake alternative: Skip traditional birthday cake and serve this instead. Add candles on top (carefully, away from the meringue) for a birthday twist.
Valentine’s Day dessert: Serve individual mini baked Alaskas (use muffin pans for brownie bases and small bowls for ice cream molds) for an intimate, impressive dessert.
FAQs About Chocolate Brownie Peppermint Baked Alaska
Can I make Chocolate Brownie Peppermint Baked Alaska without a kitchen torch?
Yes! Use your oven’s broiler instead. Preheat the broiler to high and position the rack 4-5 inches from the heating element. Place the assembled, meringue-covered baked Alaska on a baking sheet and broil for 1-2 minutes, watching constantly. Rotate the pan for even browning. The broiler works but requires vigilance meringue can go from perfect to burnt in seconds.
Why did my ice cream melt during assembly?
The ice cream wasn’t frozen solid enough. It must be rock-hard, straight from the freezer. Also, you might be working too slowly. Practice makes perfect assemble quickly, covering the ice cream with meringue within 2-3 minutes. If needed, return everything to the freezer for 30 minutes and try again.
Can I make this ahead for a party?
Absolutely! This is actually ideal as a make-ahead dessert. Bake the brownie 1-3 days ahead, shape the ice cream 1-2 days ahead, and store both in the freezer. You can even assemble the entire dessert (with meringue) up to 2 days before serving just wrap it loosely and freeze. Torch right before serving for best results.
My meringue is weeping. What went wrong?
You likely used French meringue (raw eggs and sugar) instead of Italian meringue. Italian meringue, made with cooked sugar syrup, is much more stable. Also ensure your bowl and whisk are completely grease-free, and that the meringue completely seals the ice cream with no gaps.
Is Chocolate Brownie Peppermint Baked Alaska safe to eat with raw egg whites?
When you make Italian meringue properly, the hot sugar syrup (at 240°F) cooks the egg whites, making them safe to eat. This is why Italian meringue is preferred over French meringue for dishes that won’t be further cooked. The heat from torching also provides additional cooking. However, if you’re concerned, use pasteurized egg whites from a carton.
Can I use store-bought components?
Yes! Use store-bought brownies from a bakery (just trim to fit), premium ice cream, and even store-bought meringue cookies crushed and mixed with whipped cream as a simplified topping (though this won’t have the same dramatic effect). The results won’t be quite as impressive, but you’ll still have a delicious dessert.
How do I slice this without making a mess?
Use a sharp chef’s knife dipped in very hot water. Wipe the knife clean between each slice. Make confident, smooth cuts straight down through all layers. Don’t saw back and forth one decisive cut per side of each slice works best. Serve immediately after cutting.
Can I make mini individual Baked Alaskas?
Definitely! Use muffin tins for brownie bases (bake for 15-18 minutes), scoop ice cream into small balls and freeze on a baking sheet, then assemble individually. Cover each ice cream ball with meringue and torch. These are perfect for plated dessert courses at dinner parties and ensure everyone gets a perfect portion.
Conclusion
There you have it the complete guide to creating a spectacular Chocolate Brownie Peppermint Baked Alaska that’ll make you the star of every holiday gathering. This isn’t just dessert; it’s theater, it’s drama, it’s that magical moment when you torch the meringue and watch everyone’s eyes light up with delight.
If you found this recipe helpful, we encourage you to share it with your network or save it for future use.
We’d be delighted to see your unique creations feel free to share your photos with us pinterest
Print
Chocolate Brownie Peppermint Baked Alaska 9 Secrets for Breathtaking Results
- Total Time: 6 hours 10 minutes (includes freezing time)
- Yield: 8 servings 1x
- Diet: Vegetarian
Description
Chocolate Brownie Peppermint Baked Alaska is a show-stopping holiday dessert featuring a rich fudge brownie base, cool peppermint ice cream center, and a toasted meringue topping for the ultimate festive indulgence.
Ingredients
Brownie Base:
1/2 cup unsalted butter, melted
1 cup granulated sugar
2 large eggs
1 tsp vanilla extract
1/3 cup unsweetened cocoa powder
1/2 cup all-purpose flour
1/4 tsp salt
1/4 tsp baking powder
Peppermint Ice Cream Layer:
1 quart peppermint ice cream, softened
1/4 cup crushed peppermint candy or candy canes
Meringue Topping:
4 large egg whites
1 cup granulated sugar
1/4 tsp cream of tartar
1/2 tsp peppermint extract
Instructions
1. Preheat oven to 350°F (175°C). Grease and line an 8-inch round pan with parchment paper.
2. In a large bowl, whisk together melted butter, sugar, eggs, and vanilla until smooth.
3. Add cocoa powder, flour, salt, and baking powder; stir until just combined.
4. Pour into prepared pan and bake for 20–25 minutes, until set. Cool completely.
5. Line a separate 8-inch bowl with plastic wrap and fill with softened peppermint ice cream mixed with crushed candy.
6. Freeze for at least 4 hours or until firm.
7. Once both layers are ready, place the ice cream dome on top of the brownie base. Keep frozen while making the meringue.
8. To make meringue, beat egg whites and cream of tartar until foamy. Gradually add sugar and continue beating until stiff, glossy peaks form.
9. Beat in peppermint extract.
10. Spread or pipe meringue evenly over the frozen dessert, sealing completely.
11. Use a kitchen torch to toast the meringue until golden, or broil briefly in the oven (watch closely).
12. Serve immediately, or freeze up to 24 hours before serving.
Notes
You can prepare the brownie and ice cream layers a day ahead for easier assembly.
Try using chocolate or vanilla ice cream with peppermint extract for a flavor twist.
For an elegant touch, drizzle melted chocolate over the toasted meringue.
Keep the dessert frozen until ready to torch and serve for best texture.
- Prep Time: 45 minutes
- Cook Time: 25 minutes
- Category: Dessert
- Method: Baked and Torched
- Cuisine: American
Nutrition
- Serving Size: 1 slice
- Calories: 480
- Sugar: 48
- Sodium: 160
- Fat: 22
- Saturated Fat: 13
- Unsaturated Fat: 8
- Trans Fat: 0
- Carbohydrates: 63
- Fiber: 2
- Protein: 6
- Cholesterol: 110
Keywords: chocolate brownie peppermint baked alaska, holiday dessert, christmas baked alaska, peppermint ice cream cake, toasted meringue dessert