Tired of store-bought Valentine’s treats that taste artificial and leave everyone disappointed? Exhausted from complicated dessert recipes that promise romantic elegance but deliver kitchen disasters? I’m Simon, and I’ll never forget the February afternoon when Megan Carter, my pastry genius, walked into our test kitchen with a wild idea. “Simon,” she said, eyes bright with excitement, “we’re making red velvet cookies, but with a twist that’ll make hearts flutter.” What followed was two weeks of testing that created our most swoon-worthy Valentine’s dessert.
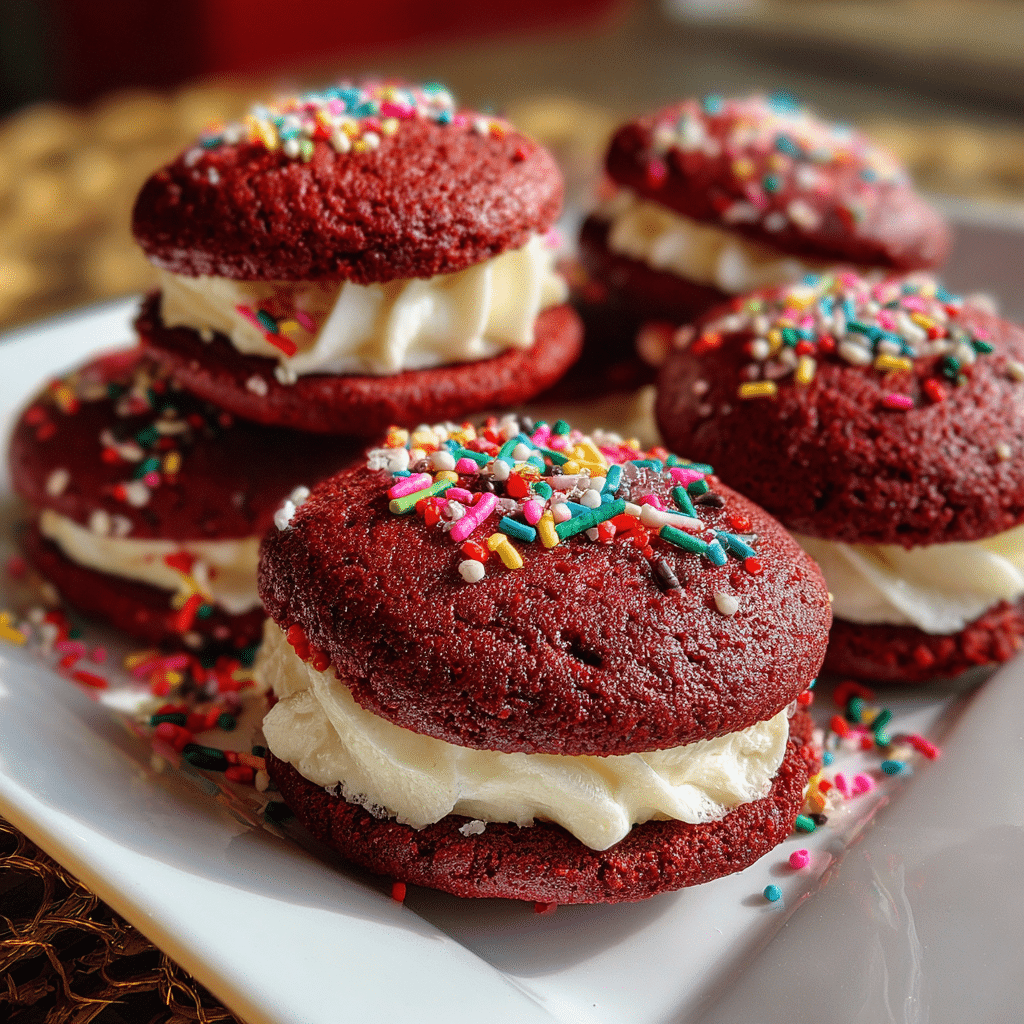
These Chocolate Filled Red Velvet Cookies deliver pillowy-soft red velvet perfection with a molten chocolate center that oozes when you bite into it, all wrapped in that signature cocoa-tangy flavor we love. Every cookie combines the classic red velvet cake taste with the fun of a handheld treat and the drama of a gooey chocolate surprise inside. Whether you’re impressing your Valentine, bringing something special to a party, or treating yourself to luxurious comfort, this recipe brings bakery-quality romance to your kitchen with surprisingly simple techniques.
These Chocolate Filled Red Velvet Cookies use straightforward cookie dough methods combined with a clever chocolate filling technique that Megan perfected after countless trials. I’ll walk you through achieving that signature red velvet color naturally, creating the perfect tangy flavor balance, hiding chocolate centers that stay gooey, and getting that ideal soft-chewy texture. Plus, I’ll share the secrets we discovered after making these cookies twenty-four times to perfect the chocolate-to-dough ratio and prevent filling leaks.
Why This Chocolate Filled Red Velvet Cookies Recipe Works
After extensive testing and Valentine’s Day taste tests with friends and family, we’ve perfected these Chocolate Filled Red Velvet Cookies. Here’s why this recipe has become our most-loved romantic treat:
- Stunning visual appeal – Vibrant red cookies with chocolate surprise create instant wow factor
- Perfect texture balance – Soft, pillowy exterior with gooey molten center
- Classic red velvet flavor – Subtle cocoa with tangy undertone, just like the cake
- Make-ahead friendly – Dough freezes beautifully; bake fresh when needed
- Gift-worthy presentation – Perfect for Valentine’s boxes, care packages, or romantic gestures
- Beginner-friendly technique – Easier than it looks; no special equipment required
- Customizable filling – Use different chocolates for varied flavor profiles
- Impressive without being fussy – Looks complicated but comes together simply
Choosing the Right Ingredients for Chocolate Filled Red Velvet Cookies
Olivia always reminds me that beautiful food photography (and delicious cookies!) start with quality ingredients. For these Chocolate Filled Red Velvet Cookies, ingredient selection affects both appearance and flavor.
Best Chocolate for Filling
Dark Chocolate Chips or Chunks (Our Top Choice): Semi-sweet or dark chocolate (60-70% cacao) creates the perfect gooey center that contrasts beautifully with sweet cookie dough.
Why dark chocolate works best:
- Melts perfectly – Creates that molten center without being too sweet
- Flavor contrast – Balances the sweet cookie dough
- Holds shape – Doesn’t leak out during baking when properly sealed
- Rich taste – Complements the subtle cocoa in red velvet
- Visual drama – Dark chocolate against red cookie is stunning
Milk Chocolate (Sweeter Alternative): Works beautifully for those who prefer less intense chocolate. Hershey’s Kisses are perfect portion-sized for centers.
White Chocolate: Creates beautiful contrast when cookie is broken open, though less traditional.
Color and Cocoa Selection
Red Food Coloring Options:
- Gel food coloring (preferred): Creates vibrant color with less liquid, doesn’t affect texture
- Liquid food coloring: Works but requires more to achieve deep red; can thin dough slightly
- Natural alternatives: Beet powder creates softer burgundy (not bright red); use 2-3 tablespoons
Cocoa Powder:
- Dutch-processed cocoa: Smoother, less acidic flavor – traditional for red velvet
- Natural cocoa: Works but has sharper flavor; creates slightly different color
- Quality matters: Use Ghirardelli, Valrhona, or Guittard for best flavor
Buying Tips for Chocolate Filled Red Velvet Cookies
For best results:
- Gel food coloring: Buy from baking supply stores or online; lasts forever and gives best color
- Quality cocoa: Fresh cocoa powder (not expired) has better flavor
- Good chocolate: Use real chocolate chips, not baking chips (they don’t melt as smoothly)
- Fresh ingredients: Check expiration dates on baking powder, baking soda, flour
Pro tip from Megan: “Invest in gel food coloring – one bottle lasts years and gives you that true red velvet color without watering down your dough. It’s the difference between vibrant red and pinkish cookies.”
Substitutions
- Chocolate filling: Nutella, caramel, cream cheese frosting (freeze into balls first)
- Food coloring: Beet powder for natural option (expect burgundy, not bright red)
- Cocoa powder: Mix of Dutch-processed and natural works fine
- Buttermilk: Make quick substitute with milk + vinegar (see recipe)
Ingredients & Prep for Chocolate Filled Red Velvet Cookies
Cookie Dough Components
Dry Ingredients:
- 2½ cups all-purpose flour
- 2 tablespoons unsweetened cocoa powder (Dutch-processed preferred)
- 1 teaspoon baking soda
- ½ teaspoon salt
Wet Ingredients:
- ¾ cup (1½ sticks) unsalted butter, softened
- 1½ cups granulated sugar
- 2 large eggs, room temperature
- 2 teaspoons vanilla extract
- 1 tablespoon red gel food coloring (or 2-3 tablespoons liquid)
- 1 teaspoon white vinegar
Buttermilk Component:
- ½ cup buttermilk (or ½ cup milk + 1½ teaspoons white vinegar, let sit 5 minutes)
Why buttermilk matters: The acid in buttermilk reacts with baking soda to create tender texture and enhances the tangy red velvet flavor.
Chocolate Filling
Simple Option:
- 24 chocolate chips or chunks (about ½ cup)
- Or 24 Hershey’s Kisses, unwrapped
- Or 24 small pieces broken from chocolate bar
Ganache Option (more gooey):
- ½ cup chocolate chips
- 2 tablespoons heavy cream
- Heat together, stir until smooth
- Chill until scoopable (30 minutes)
- Roll into 24 small balls
Baking Essentials
Equipment needed:
- Baking sheets (2-3)
- Parchment paper or silicone baking mats
- Cookie scoop (2-tablespoon size) for uniform cookies
- Cooling racks
Optional decoration:
- Powdered sugar for dusting
- White chocolate drizzle
- Valentine’s sprinkles
Step-by-Step Baking Instructions for Chocolate Filled Red Velvet Cookies

Megan always says that perfect cookies are all about temperature control and proper technique. Let’s break down these Chocolate Filled Red Velvet Cookies.
Pre-Baking Prep for Chocolate Filled Red Velvet Cookies
- Room temperature ingredients: Remove butter and eggs from refrigerator 30-45 minutes before baking. Room temp ingredients cream together better.
- Prepare chocolate filling: If using chocolate chips, portion out 24 chips. If making ganache, prepare it first and chill while making dough.
- Make buttermilk substitute (if needed): Mix ½ cup milk with 1½ teaspoons white vinegar. Let sit 5 minutes until slightly thickened.
- Preheat oven: Set to 350°F and position racks in upper and lower thirds.
- Line baking sheets: Cover with parchment paper or silicone mats.
- Mise en place: Measure all ingredients. This dough comes together quickly once you start.
Baking Method for Chocolate Filled Red Velvet Cookies
Making the Dough:
- Cream butter and sugar: In large bowl or stand mixer, beat softened butter and sugar on medium-high speed for 3-4 minutes until light and fluffy.
- Add eggs: Add eggs one at a time, beating well after each addition. Mixture should look smooth and creamy.
- Add vanilla and color: Mix in vanilla extract and red gel food coloring. Beat until evenly colored (dough should be vibrant red).
- Add vinegar and buttermilk: Mix in white vinegar, then add buttermilk. Beat just until combined.
- Combine dry ingredients: In separate bowl, whisk together flour, cocoa powder, baking soda, and salt.
- Mix wet and dry: Add dry ingredients to wet ingredients in three additions, mixing on low speed just until combined after each addition. Don’t overmix!
- Chill dough: Cover bowl and refrigerate for 30 minutes. Chilled dough is easier to handle and prevents cookies from spreading too much.
Assembling the Cookies:
- Scoop dough: Use a 2-tablespoon cookie scoop to portion dough. You should get about 24 cookies.
- Flatten: Flatten each dough ball slightly in your palm to create a disc.
- Add chocolate: Place 1 chocolate chip, Kiss, or ganache ball in the center of the disc.
- Seal completely: Wrap dough around chocolate, rolling into a ball and sealing all edges completely. No chocolate should be visible.
- Space on sheets: Place sealed balls on prepared baking sheets, spacing 2 inches apart (they spread slightly).
- Optional flatten: Gently press each ball down slightly with your palm for more even baking.
Baking Process for Chocolate Filled Red Velvet Cookies
- Bake: Place in preheated 350°F oven for 11-13 minutes.
- Rotate halfway: At 6 minutes, rotate sheets front to back and top to bottom for even baking.
- Don’t overbake: Cookies are done when edges are set but centers still look slightly underdone. They continue cooking on the hot pan.
- Pan rest: Let cookies rest on baking sheet for 5 minutes. They’re very soft when hot.
- Transfer: Use a spatula to move cookies to cooling racks.
Doneness Check for Chocolate Filled Red Velvet Cookies
Perfect cookie indicators:
- Edges are set: Firm around the outside but center looks slightly soft
- No browning: Cookies should stay red; browning means overbaked
- Slight puff: Should be puffy, not flat
- Crackly top: May have slight cracks on surface (this is good!)
- Time check: 11-13 minutes; pull at 11 minutes for softer cookies
What underbaked looks like: Center is very shiny and wet-looking; cookies spread too much on pan.
What overbaked looks like: Edges are dark or browning; cookies are completely flat; centers are hard.
Cooling for Chocolate Filled Red Velvet Cookies
Why cooling matters: Hot cookies are extremely fragile. The chocolate center is molten. Rushing this step leads to broken cookies.
Proper cooling:
- Rest on baking sheet for 5 minutes (this is crucial!)
- Transfer to wire cooling rack
- Cool completely before storing (about 30 minutes)
- Chocolate filling will solidify as cookies cool but remains soft
Megan’s tip: “Resist the urge to eat them hot! I know the chocolate smells amazing, but wait at least 10 minutes. The filling will burn your mouth, and the cookie texture is better when cooled to warm, not hot.”
Pro Tips for Perfect Chocolate Filled Red Velvet Cookies
Achieving Vibrant Color and Soft Texture
Use gel food coloring: This is the single most important tip for achieving that signature red velvet color without compromising texture.
Don’t overbake: These cookies continue cooking on the hot pan. Pull them when centers still look slightly underdone.
Chill the dough: 30 minutes minimum. Chilled dough = less spreading = thicker cookies.
Seal chocolate completely: Any exposed chocolate will leak out and burn on the pan. Take extra care sealing the edges.
Tool Recommendations for Chocolate Filled Red Velvet Cookies
Essential tools:
- Stand mixer or hand mixer: Creaming butter and sugar properly is crucial
- Cookie scoop (2-tablespoon): Ensures uniform size for even baking
- Parchment paper or silicone mats: Prevents sticking and ensures even browning
- Cooling racks: Allows air circulation for proper cooling
Nice to have:
- Gel food coloring set (red for these, but you’ll use others!)
- Kitchen scale for precise measurements
- Offset spatula for transferring cookies
- Airtight container for storage
Storage & Gifting for Chocolate Filled Red Velvet Cookies
Room temperature storage (best for 3-4 days):
- Store in airtight container
- Layer with parchment between layers
- Keep at cool room temperature
- Cookies stay soft for 4-5 days
Refrigeration (up to 1 week):
- Same storage method
- Bring to room temperature before serving for best texture
- Cold cookies are more firm
Freezing (up to 3 months):
- Baked cookies: Freeze in airtight container for up to 3 months; thaw at room temp
- Cookie dough balls: Freeze assembled, chocolate-filled dough balls on tray, then transfer to freezer bag; bake from frozen, adding 2-3 minutes
Gifting presentation:
- Layer in decorative box with parchment
- Tie with ribbon and attach recipe card
- Include storage instructions
- Pack with tissue paper to prevent shifting
Flavor Variations for Chocolate Filled Red Velvet Cookies
Our test kitchen has developed delicious twists on these Chocolate Filled Red Velvet Cookies. Here are our favorites:
White Chocolate Red Velvet Cookies
Elegant, sweet variation:
- White chocolate filling: Use white chocolate chips instead of dark
- White chocolate drizzle: Melt white chocolate and drizzle over cooled cookies
- Optional: Add white chocolate chips to the dough itself
- Visual: Beautiful contrast when broken open
Cream Cheese Filled Red Velvet Cookies
Classic red velvet cake flavor:
- Cream cheese filling: Beat 4 oz cream cheese with ¼ cup powdered sugar
- Freeze into balls: Scoop and freeze 30 minutes before using
- Assembly: Use frozen cream cheese balls as filling
- Result: Tastes just like red velvet cake with frosting!
Mint Chocolate Red Velvet Cookies
Holiday twist:
- Mint filling: Use mint dark chocolate chips or Andes mints
- Peppermint extract: Add ½ teaspoon to dough
- Perfect for: Christmas in addition to Valentine’s Day
Flavor Variation Comparison
| Variation | Filling Change | Dough Modification | Best For |
|---|---|---|---|
| Original | Dark chocolate | Classic recipe | Valentine’s Day, chocolate lovers |
| White Chocolate | White chocolate chips | None | Elegant gifts, weddings |
| Cream Cheese | Frozen cream cheese balls | None | Purists, red velvet cake fans |
| Peanut Butter | Reese’s cups, chopped | Add ¼ cup PB to dough | Kids, PB lovers |
| Mint | Andes mints | Add ½ tsp mint extract | Holidays, refreshing twist |
| S’mores | Chocolate + mini marshmallow | Add graham cracker crumbs | Fun, nostalgic |
Serving Suggestions for Chocolate Filled Red Velvet Cookies
These Chocolate Filled Red Velvet Cookies are perfect on their own, but here’s how to make them extra special:
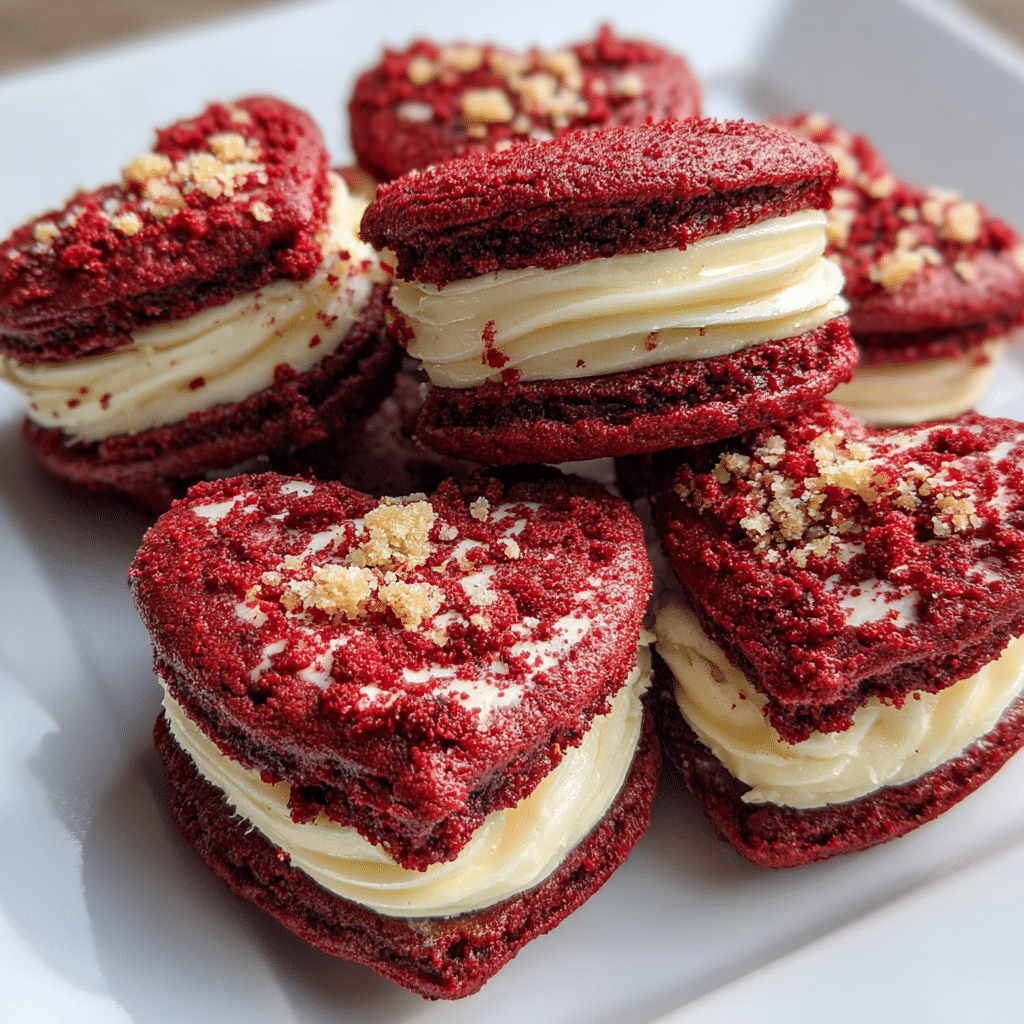
Romantic Valentine’s Presentation:
- Arrange on white platter for color contrast
- Dust with powdered sugar
- Serve with champagne or sparkling cider
- Break one open to show the chocolate center
Valentine’s Day Gift Box:
- Layer 6-12 cookies in decorative box
- Separate layers with parchment or wax paper
- Include note card with serving suggestions
- Tie with red or pink ribbon
Dessert Spread:
- Serve alongside fresh strawberries
- Offer with vanilla ice cream
- Pair with hot chocolate or coffee
- Create a cookie platter with other Valentine’s treats
Party Display:
- Stack on tiered dessert stand
- Label with cute name card
- Provide small plates and napkins
- Set out milk or coffee nearby
Beverage Pairings:
- Hot chocolate with marshmallows
- Cold milk (classic)
- Coffee or espresso
- Hot tea (Earl Grey complements chocolate)
- Champagne or sparkling cider (for adults)
Creative Serving:
- Cookie ice cream sandwiches (flatten cookies slightly)
- Crumble over ice cream or yogurt
- Package individually for party favors
- Include in Valentine’s breakfast in bed
FAQs About Chocolate Filled Red Velvet Cookies
Can I make Chocolate Filled Red Velvet Cookies without food coloring? Yes, but they won’t be red. The cookies will be light brown from the cocoa powder. For natural coloring, use 2-3 tablespoons beet powder, which creates a burgundy color. The flavor remains the same regardless of color.
Why did my chocolate filling leak out? Two common causes: (1) The dough wasn’t sealed completely around the chocolate – make sure no chocolate is visible before baking, or (2) The cookies were overbaked – high heat can cause chocolate to burst through. Ensure dough is completely sealed and bake at correct temperature.
Can I make the dough ahead of time? Yes! Refrigerate dough (before adding filling) for up to 3 days, or freeze for up to 3 months. You can also assemble the filled cookie dough balls and freeze them, then bake from frozen (add 2-3 minutes to baking time).
Are Chocolate Filled Red Velvet Cookies safe during pregnancy? Yes! All ingredients are safe when using pasteurized eggs and properly stored ingredients. The cookies are fully baked to safe temperatures. If using homemade buttermilk substitute, ensure milk is pasteurized.
How do I get that bright red color? Use gel food coloring, not liquid. Gel is concentrated and won’t thin your dough. Start with 1 tablespoon and add more if needed. AmeriColor “Super Red” or Wilton “Red Red” give the best results. Natural options (beet powder) create burgundy, not bright red.
Can I use a different type of chocolate? Absolutely! Milk chocolate, white chocolate, mint chocolate, or even peanut butter cups work beautifully. Just ensure whatever you use is roughly chocolate chip-sized so the dough can seal around it properly.
Why are my cookies flat instead of puffy? Usually from warm dough or expired baking soda. Always chill dough for at least 30 minutes. Check that your baking soda is fresh (write date on box). Also ensure your butter was properly softened, not melted.
How do I store these to keep them soft? Store in an airtight container at room temperature with a piece of bread. The bread releases moisture that keeps cookies soft. Replace bread every 2 days. Properly stored, they stay soft for 4-5 days.
Conclusion
There you have it the Chocolate Filled Red Velvet Cookies recipe that’s become our most romantic dessert creation. From Megan’s innovative inspiration to your Valentine’s celebration, these cookies prove that homemade treats can be both impressive and achievable. Every soft, chocolaty, gorgeous-red bite delivers the kind of love that only comes from baking from scratch.
Print
Chocolate Filled Red Velvet Cookies 5 Secrets to Stunning Valentine Bliss
- Total Time: 63
- Yield: 24 cookies 1x
- Diet: Vegetarian
Description
Stunning red velvet cookies with molten chocolate centers that ooze when you bite into them. These soft, pillowy cookies combine classic red velvet cake flavor with the fun of a handheld treat and the drama of a gooey chocolate surprise inside. Perfect for Valentine’s Day, gifts, or any time you want to impress with a romantic dessert. The vibrant red color and rich chocolate filling make these cookies absolutely irresistible.
Ingredients
2½ cups all-purpose flour
2 tablespoons unsweetened cocoa powder (Dutch-processed preferred)
1 teaspoon baking soda
½ teaspoon salt
¾ cup (1½ sticks) unsalted butter, softened
1½ cups granulated sugar
2 large eggs, room temperature
2 teaspoons vanilla extract
1 tablespoon red gel food coloring (or 2–3 tablespoons liquid)
1 teaspoon white vinegar
½ cup buttermilk (or ½ cup milk + 1½ teaspoons vinegar)
24 chocolate chips or Hershey’s Kisses (for filling)
Optional: powdered sugar for dusting, white chocolate for drizzling
Instructions
1. Remove butter and eggs from refrigerator 30-45 minutes before baking to bring to room temperature.
2. If making buttermilk substitute, mix ½ cup milk with 1½ teaspoons white vinegar and let sit 5 minutes.
3. Preheat oven to 350°F. Line baking sheets with parchment paper or silicone baking mats.
4. In a large bowl or stand mixer, beat softened butter and sugar on medium-high speed for 3-4 minutes until light and fluffy.
5. Add eggs one at a time, beating well after each addition until smooth and creamy.
6. Mix in vanilla extract and red gel food coloring. Beat until dough is evenly colored and vibrant red.
7. Add white vinegar and buttermilk. Beat just until combined.
8. In a separate bowl, whisk together flour, cocoa powder, baking soda, and salt.
9. Add dry ingredients to wet ingredients in three additions, mixing on low speed just until combined after each. Don’t overmix!
10. Cover bowl and refrigerate dough for 30 minutes (this prevents spreading during baking).
11. Using a 2-tablespoon cookie scoop, portion dough into 24 balls.
12. Flatten each ball slightly in your palm to create a disc.
13. Place 1 chocolate chip, Kiss, or chocolate chunk in the center of each disc.
14. Wrap dough completely around chocolate, rolling into a ball and sealing all edges. No chocolate should be visible.
15. Place sealed balls on prepared baking sheets, spacing 2 inches apart. Gently press each ball down slightly.
16. Bake for 11-13 minutes, rotating sheets halfway through, until edges are set but centers still look slightly soft.
17. Remove from oven and let cookies rest on baking sheet for 5 minutes (they’re very soft when hot).
18. Transfer to wire cooling racks to cool completely, about 30 minutes.
19. Optional: Dust with powdered sugar or drizzle with melted white chocolate once cooled.
20. Store in airtight container at room temperature for up to 5 days.
Notes
Use gel food coloring for vibrant red without thinning dough. Liquid food coloring works but requires more and can affect texture.
Chill dough for 30 minutes minimum – this prevents cookies from spreading too much and keeps them thick.
Seal chocolate completely inside dough or it will leak out during baking.
Don’t overbake! Pull cookies when centers still look slightly underdone. They continue cooking on hot pan.
Room temperature butter and eggs are crucial for proper creaming and texture.
Cookies stay soft for 4-5 days stored in airtight container. Add a piece of bread to container to maintain softness.
Can freeze baked cookies for up to 3 months or freeze assembled dough balls and bake from frozen (add 2-3 minutes).
For natural coloring, use 2-3 tablespoons beet powder (creates burgundy, not bright red).
Fresh baking soda is essential for proper rise – check expiration date.
- Prep Time: 20
- Cook Time: 13
- Category: Dessert, Cookies, Valentine’s Day
- Method: Baking
- Cuisine: American
Nutrition
- Serving Size: 1 cookie
- Calories: 165
- Sugar: 15g
- Sodium: 95mg
- Fat: 7g
- Saturated Fat: 4g
- Unsaturated Fat: 2g
- Trans Fat: 0g
- Carbohydrates: 24g
- Fiber: 1g
- Protein: 2g
- Cholesterol: 30mg
Keywords: red velvet cookies, chocolate filled cookies, valentine cookies, red velvet dessert, romantic dessert, stuffed cookies