Tired of serving the same bland, overcooked vegetables at holiday dinners while everyone reaches for seconds of everything else? Last Thanksgiving, I watched as my aunt’s mushy, flavorless carrots sat untouched in the serving dish while the mashed potatoes disappeared within minutes. That moment inspired me to perfect these Glazed Carrots a side dish so irresistible that it rivals the main course for attention. The secret lies in the perfect balance of sweet and savory, a glossy butter glaze, and cooking the carrots just until tender-crisp rather than mushy.
These Glazed Carrots deliver everything you want in a holiday side dish: stunning presentation with their glossy, caramelized coating, sophisticated flavor that appeals to all ages, and foolproof technique that ensures perfect results every time. Jackson Reed, my grill master colleague, taught me that vegetables deserve the same attention to detail as proteins, and that philosophy transformed how I approach side dishes. After testing various glazing techniques and sweetener combinations with my team, we created a recipe that’s become the most requested side dish at our holiday gatherings.
As someone who’s been cooking professionally for fifteen years and understands how to elevate simple ingredients, I can tell you that Glazed Carrots are the ultimate make-ahead-friendly, crowd pleasing vegetable. In this comprehensive guide, I’ll share everything you need: selecting the right carrots for optimal texture, mastering the glazing technique, timing your preparation for stress-free entertaining, and creating flavor variations that keep this dish exciting year after year.
Why This Glazed Carrots Recipe Works
These Glazed Carrots succeed where other vegetable sides fail because they combine proper cooking technique with a perfectly balanced glaze that enhances rather than masks the carrots’ natural sweetness. Here’s what makes them special:
- Elegant simplicity: Just six ingredients create restaurant-quality results that look and taste gourmet
- Perfect texture: Tender-crisp carrots maintain their integrity without becoming mushy or remaining too crunchy
- Make-ahead friendly: Can be prepared hours in advance and reheated without quality loss
- Universal appeal: The sweet-savory profile satisfies both adults and children
- Visually stunning: The glossy glaze catches the light beautifully and adds vibrant color to holiday tables
- Quick preparation: Ready in just 20 minutes from start to finish
- Budget-friendly: Transforms inexpensive carrots into an impressive side dish
Choosing the Right Carrots for Glazed Carrots
Not all carrots are created equal when it comes to glazing. The variety, size, and freshness you choose directly impact the final result of your Glazed Carrots.
Best Carrot Types for This Recipe
Standard medium carrots (about ¾ inch in diameter) are ideal for glazing because they cook evenly and create uniform pieces. Look for true carrots rather than baby carrots, which are often just standard carrots machine-cut into small pieces. These “baby-cut” carrots tend to be drier and less sweet than whole carrots you cut yourself.
If you can find them, organic carrots often have superior flavor sweeter, earthier, and more pronounced carrot taste. Heirloom varieties in purple, yellow, or white create a stunning multicolored presentation perfect for special occasions. Rainbow carrots cooked together make the dish a true conversation piece.
Avoid “baby” carrots (the short, thick ones that come in bags) for this recipe. While convenient, they’re less flavorful and have a different texture when cooked. They also lack the natural sweetness that makes glazed carrots shine.
Buying and Storage Tips
Select firm carrots with smooth skin and vibrant orange color. Avoid carrots with cracks, soft spots, or those that bend easily these signs indicate age and moisture loss. If buying carrots with tops attached, the greens should look fresh and perky, not wilted. Remove the tops immediately when you get home, as they draw moisture from the roots.
Store carrots in the refrigerator crisper drawer in a perforated plastic bag for up to 3 weeks. The slight air circulation prevents moisture buildup while maintaining freshness. Don’t store carrots near apples or pears, as these fruits release ethylene gas that causes carrots to become bitter.
Carrot Substitutions and Alternatives
While traditional orange carrots are classic, purple and yellow varieties work beautifully and add visual interest. Purple carrots have a slightly peppery taste, while yellow ones are sweeter and more mild. You can also use parsnips prepared the same way for a sweeter, nuttier flavor that’s equally delicious.
For a mixed vegetable glaze, combine carrots with parsnips or turnips cut to the same size. The cooking time remains the same, and the variety of colors and flavors creates a more complex side dish perfect for special occasions.
Ingredients & Prep for Glazed Carrots

Core Ingredients
- 2 pounds medium carrots, peeled and sliced
- 3 tablespoons unsalted butter
- 3 tablespoons honey or maple syrup
- 2 tablespoons brown sugar
- ½ teaspoon salt
- ¼ teaspoon black pepper
- ¼ teaspoon ground cinnamon (optional)
- 2 tablespoons fresh parsley, chopped (for garnish)
- 1 cup water or vegetable broth
Optional Flavor Enhancers
- 1 teaspoon fresh thyme leaves
- ½ teaspoon ground ginger
- Zest of 1 orange
- 1 tablespoon balsamic vinegar for depth
- ¼ cup chopped pecans or walnuts for crunch
- 2 teaspoons Dijon mustard for tang
Essential Prep Work
Peel your carrots using a vegetable peeler, removing all the outer skin for the best texture and appearance. Cut off both ends – the thick top and the thin, pointy bottom. Slice carrots on a slight diagonal into ½-inch thick pieces. The diagonal cut creates more surface area for the glaze to coat and looks more elegant than straight cuts.
Keep your carrot pieces uniform in size so they cook evenly. Thicker pieces at the top of the carrot should be cut slightly thinner, while the narrow end pieces can be a bit thicker. This attention to uniform sizing prevents some pieces from being mushy while others remain crunchy.
If preparing ahead, you can peel and slice carrots up to 24 hours in advance. Store them in a container or bag with a damp paper towel in the refrigerator to prevent drying. Bring them to room temperature before cooking for more even results.
Step-by-Step Cooking Instructions for Glazed Carrots

Pre-Cooking Prep for Glazed Carrots
Fill a large skillet or sauté pan (at least 12 inches) with 1 cup of water or vegetable broth. The pan should be wide enough that carrots can spread out in a relatively single layer – overcrowding creates steaming rather than glazing. Add the sliced carrots and a pinch of salt, bringing the liquid to a boil over high heat.
Once boiling, reduce heat to medium-high and cook carrots uncovered for 8-10 minutes, stirring occasionally. The goal is to cook them until they’re tender-crisp – easily pierced with a fork but with slight resistance in the center. The liquid should reduce significantly during this time.
Test a carrot piece at the 8-minute mark. It should be tender but not soft, and definitely not crunchy. If it’s still too firm, continue cooking for another 2-3 minutes. Remember that carrots will continue cooking slightly in the residual heat and glaze.
Glazing Method for Glazed Carrots
When carrots are tender-crisp and most of the liquid has evaporated (about 2 tablespoons should remain), add butter, honey, brown sugar, cinnamon (if using), salt, and pepper to the pan. Stir everything together, coating the carrots thoroughly in the glaze mixture.
Continue cooking over medium heat for 3-5 minutes, stirring frequently, until the butter and sugars melt together and form a glossy, thick glaze that coats the carrots beautifully. The glaze should bubble gently and reduce to a syrupy consistency. During this time, the carrots will caramelize slightly, developing even deeper flavor.
Watch the pan carefully during this glazing phase. The sugars can burn quickly if the heat is too high. If you notice any scorching, immediately reduce the heat and add a tablespoon of water to prevent burning. The glaze should look shiny and thick, clinging to each carrot piece rather than pooling at the bottom of the pan.
Finishing Touches for Glazed Carrots
Once the glaze has thickened and the carrots are beautifully coated, taste and adjust seasonings. Sometimes an extra pinch of salt enhances the sweet-savory balance, or a grind of black pepper adds welcome complexity. If the glaze seems too thick, add a teaspoon of water and stir to loosen it slightly.
Transfer the Glazed Carrots to a warm serving dish and garnish generously with fresh chopped parsley. The bright green herbs provide beautiful color contrast against the glossy orange carrots. For extra elegance, add a sprinkle of flaky sea salt or a few leaves of fresh thyme.
Serve immediately while hot and glossy, or keep warm in a covered dish for up to 30 minutes. If making ahead, prepare carrots completely, then reheat gently in a skillet over low heat with a tablespoon of butter to refresh the glaze.
Pro Tips for Perfect Glazed Carrots
Achieving Ideal Texture in Your Glazed Carrots
The difference between perfect glazed carrots and disappointing ones comes down to texture. Undercooked carrots are unpleasantly crunchy and don’t absorb the glaze properly, while overcooked ones become mushy and fall apart. Aim for that sweet spot where carrots are tender enough to eat easily but still have structure.
Use medium heat during the glazing phase rather than high heat. High heat causes the glaze to caramelize too quickly, potentially burning before the carrots finish cooking. Medium heat allows the glaze to reduce and thicken gradually while developing complex flavors through gentle caramelization.
Cut carrots uniformly for even cooking. If you have particularly thick carrots, consider cutting them lengthwise first, then slicing the halves into half moons. This creates more even pieces that cook at the same rate.
Essential Equipment for Glazed Carrots
A large skillet (12 inches) is ideal for this recipe because it provides enough surface area for carrots to cook in a relatively single layer. A smaller pan forces you to pile carrots, creating steaming rather than proper glazing. Cast iron or stainless steel work beautifully; nonstick is fine but won’t develop quite the same caramelization.
A good vegetable peeler speeds up prep work significantly. I prefer Y-shaped peelers for their efficiency and ease of use. A sharp chef’s knife ensures clean, uniform cuts that look professional and cook evenly.
Storage and Make-Ahead Strategies
These Glazed Carrots are perfect for make-ahead holiday cooking. Prepare them completely up to 2 days in advance, then store in an airtight container in the refrigerator. To reheat, place in a skillet over medium-low heat with 1-2 tablespoons of butter, stirring gently until heated through and the glaze becomes glossy again. Alternatively, microwave in a covered dish, stirring halfway through.
The carrots maintain excellent quality when reheated, sometimes tasting even better as the flavors have time to meld. This make-ahead capability makes them ideal for holiday meals when oven and stovetop space is precious. You can prep, cook, and refrigerate them in the morning, then reheat just before serving dinner.
Flavor Variations for Glazed Carrots
Maple Pecan Glazed Carrots
Transform your Glazed Carrots into an autumn-inspired masterpiece by replacing honey with pure maple syrup and adding ½ cup of toasted chopped pecans during the last 2 minutes of cooking. The maple provides deeper, more complex sweetness while the pecans add buttery crunch. Finish with a sprinkle of cinnamon for cozy fall flavor perfect for Thanksgiving.
Honey Ginger Glazed Carrots
Add Asian-inspired flair by incorporating 1 tablespoon of freshly grated ginger and 1 teaspoon of sesame oil into the glaze. Replace brown sugar with an additional tablespoon of honey. Garnish with toasted sesame seeds and sliced green onions instead of parsley. This variation pairs beautifully with roasted chicken or fish.
Orange Glazed Carrots
Create bright, citrusy carrots by adding the zest of one orange and ¼ cup of fresh orange juice to the glaze. Reduce the water to ¾ cup to account for the added liquid. The orange complements the carrots’ natural sweetness while adding brightness that cuts through rich holiday meals. This version is particularly stunning when made with both orange and purple carrots.
Glazed Carrots Variation Table
| Variation | Key Ingredients | Flavor Profile | Best Pairing | Holiday Fit |
|---|---|---|---|---|
| Classic Honey Butter | Honey, butter, brown sugar | Sweet and savory | Roasted turkey or chicken | Thanksgiving, Christmas |
| Maple Pecan | Maple syrup, pecans, cinnamon | Warm and nutty | Ham or roasted meats | Thanksgiving, Easter |
| Honey Ginger | Fresh ginger, honey, sesame | Spicy and aromatic | Asian-inspired mains | Any occasion |
| Orange Glazed | Orange juice and zest | Bright and citrusy | Duck or fish | Christmas, Easter |
| Balsamic Glazed | Balsamic vinegar, thyme | Tangy and sophisticated | Beef or lamb | Dinner parties |
| Brown Butter Sage | Browned butter, fresh sage | Nutty and herbaceous | Fall roasts | Thanksgiving |
Serving Suggestions for Glazed Carrots
These Glazed Carrots complement virtually any main course, but they particularly shine alongside traditional holiday proteins. Serve them with roasted turkey for Thanksgiving, where their sweetness balances the savory turkey and rich gravy. For Christmas dinner, they pair beautifully with prime rib, roasted chicken, or baked fish, adding vibrant color and natural sweetness to the plate.
Arrange the glazed carrots on a white or cream-colored serving platter to make their glossy orange coating pop visually. Olivia, our food stylist, suggests using a shallow oval platter rather than a deep bowl – the shallow presentation showcases each carrot piece and allows the glaze to pool attractively around them. Garnish generously with fresh herbs and consider adding a few sprigs of fresh thyme or rosemary for visual impact.
For a complete holiday vegetable presentation, serve these Glazed Carrots alongside roasted Brussels sprouts, creamy mashed potatoes, and green bean casserole. The variety of colors, textures, and flavors creates a feast for both the eyes and palate. The sweet carrots provide welcome contrast to savory sides.
These carrots work beautifully in a family-style serving setup where dishes are passed around the table. Transfer them to a warm serving dish just before bringing to the table, and provide a serving spoon so guests can scoop both carrots and glaze together. The glossy presentation will have everyone reaching for seconds.
For weeknight dinners, these carrots elevate simple meals like grilled chicken, baked fish, or steak. They transform an ordinary Tuesday dinner into something special, proving that side dishes deserve just as much attention as the main course.
FAQs About Glazed Carrots
Can I use baby carrots for this Glazed Carrots recipe?
While you can use baby-cut carrots (the small pre-cut ones in bags), I don’t recommend them as they’re often drier and less flavorful than whole carrots you cut yourself. If convenience is paramount, they’ll work, but increase the cooking time by 2-3 minutes as they’re denser. True baby carrots (the small, immature whole carrots) work well but are expensive – cook them whole for beautiful presentation.
How do I prevent my Glazed Carrots from becoming mushy?
Cook carrots just until tender-crisp, not soft. Start checking at the 8-minute mark by piercing a piece with a fork it should slide in with slight resistance. Remember that carrots continue cooking in the residual heat and glaze, so slightly undercooking initially is better than overcooking. Also, cut carrots uniformly so they cook at the same rate.
Can I make Glazed Carrots ahead of time for Thanksgiving?
Absolutely! These are one of the best make-ahead side dishes. Prepare them completely up to 2 days in advance and refrigerate in an airtight container. Reheat gently in a skillet with 1-2 tablespoons of butter over medium-low heat, stirring occasionally until heated through and glossy. They taste just as good, sometimes even better, when made ahead.
What’s the best substitute for honey in Glazed Carrots?
Maple syrup is an excellent 1:1 substitute that provides similar sweetness with deeper, more complex flavor. Agave nectar works well for a neutral sweetness. For sugar-free versions, you can use monk fruit syrup or sugar-free maple syrup, though the glaze may be slightly thinner. Increase the brown sugar by 1 tablespoon if omitting honey entirely.
How do I store leftover Glazed Carrots?
Store cooled carrots in an airtight container in the refrigerator for up to 4 days. The glaze may solidify when cold this is normal. Reheat gently in a skillet or microwave, adding a pat of butter if needed to refresh the glaze. They’re not suitable for freezing, as the texture becomes watery and mushy upon thawing.
Can I double this Glazed Carrots recipe for a large gathering?
Yes! This recipe doubles or triples easily. Use a very large skillet (14 inches or larger) or work in two separate pans to avoid overcrowding. Overcrowded carrots steam rather than glaze properly. All other instructions remain the same. You may need to cook in batches if your pan isn’t large enough to hold all carrots in a relatively single layer.
Why are my Glazed Carrots not glossy?
A glossy glaze comes from proper reduction and emulsification of butter with sugars. If your glaze is thin and watery, continue cooking a bit longer to evaporate excess moisture. If it’s thick but not glossy, add 1-2 teaspoons of butter and stir vigorously to create that shiny coating. Also ensure you’re stirring frequently during the glazing phase to coat carrots evenly.
Are Glazed Carrots suitable for diabetics?
The honey and brown sugar create a fairly high-sugar dish, so diabetics should consume in moderation. To make them more diabetic-friendly, reduce the honey and brown sugar by half, or use sugar substitutes designed for cooking. The carrots’ natural sweetness provides flavor even with reduced added sugars. Pair with protein to help stabilize blood sugar response.
Conclusion
These Glazed Carrots have earned their place as a holiday table staple in countless homes, and for good reason. They transform an everyday vegetable into an elegant side dish that rivals the main course for attention. The glossy, caramelized coating, tender-crisp texture, and perfect sweet-savory balance create a dish that’s as beautiful as it is delicious. Best of all, the simple technique and make-ahead friendliness remove stress from holiday cooking.
Print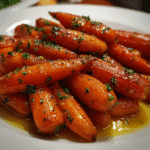
Glazed Carrots 6 Brilliant Secrets to Holiday Perfection
- Total Time: 25
- Yield: 6 1x
Description
These Glazed Carrots are the ultimate holiday side dish that steals the spotlight at every gathering! Tender-crisp carrots are coated in a glossy butter-honey-brown sugar glaze that’s perfectly balanced between sweet and savory. Ready in just 20 minutes with simple ingredients, they’re elegant enough for Christmas and Thanksgiving dinners yet easy enough for weeknight meals. The make-ahead friendly recipe means stress-free entertaining. Your family will request these carrots at every holiday!
Ingredients
2 pounds medium carrots, peeled and sliced diagonally into ½-inch pieces
3 tablespoons unsalted butter
3 tablespoons honey or pure maple syrup
2 tablespoons brown sugar
½ teaspoon salt
¼ teaspoon black pepper
¼ teaspoon ground cinnamon (optional)
2 tablespoons fresh parsley, chopped (for garnish)
1 cup water or vegetable broth
OPTIONAL FLAVOR ENHANCERS:
1 teaspoon fresh thyme leaves
½ teaspoon ground ginger
Zest of 1 orange
1 tablespoon balsamic vinegar
¼ cup toasted chopped pecans or walnuts
Instructions
1. Peel carrots and cut off both ends. Slice diagonally into uniform ½-inch thick pieces for even cooking.
2. Fill a large 12-inch skillet with 1 cup water or vegetable broth. Add sliced carrots and a pinch of salt. Bring to a boil over high heat.
3. Once boiling, reduce heat to medium-high and cook uncovered for 8-10 minutes, stirring occasionally, until carrots are tender-crisp when pierced with a fork. Most of the liquid should evaporate, leaving about 2 tablespoons in the pan.
4. Add butter, honey (or maple syrup), brown sugar, cinnamon (if using), salt, and pepper to the pan with the carrots. Stir everything together, coating carrots thoroughly.
5. Continue cooking over medium heat for 3-5 minutes, stirring frequently, until butter and sugars melt together and form a thick, glossy glaze that coats each carrot piece. The glaze should bubble gently and reduce to syrupy consistency.
6. Watch carefully during glazing to prevent burning. If glaze becomes too thick or starts to scorch, add 1 tablespoon of water and reduce heat.
7. Taste and adjust seasonings if needed. Add extra salt, pepper, or a pinch of sugar to achieve perfect sweet-savory balance.
8. Transfer glazed carrots to a warm serving dish. Garnish generously with fresh chopped parsley. For extra elegance, add a sprinkle of flaky sea salt or fresh thyme leaves.
9. Serve immediately while hot and glossy, or keep warm in a covered dish for up to 30 minutes.
Notes
Cut carrots uniformly (½-inch thick) so they cook evenly without some pieces being mushy and others crunchy.
Cook carrots to tender-crisp, not soft – they continue cooking in the glaze and residual heat.
Don’t rush the glazing phase. Medium heat allows proper caramelization without burning.
Make-ahead: Prepare completely up to 2 days ahead. Refrigerate, then reheat in skillet with 1-2 tablespoons butter.
For thicker glaze, cook a bit longer. For thinner glaze, add a teaspoon of water.
Rainbow carrots (purple, yellow, orange) create stunning presentation perfect for holidays.
Avoid baby-cut carrots from bags – they’re less flavorful than whole carrots you slice yourself.
Recipe doubles easily but use a very large skillet (14 inches) to avoid overcrowding.
Store leftovers refrigerated up to 4 days. Reheat gently with extra butter to refresh glaze.
- Prep Time: 10
- Cook Time: 15
- Category: Side Dish
- Method: Stovetop
- Cuisine: American
Nutrition
- Serving Size: 1
- Calories: 140
- Sugar: 16g
- Sodium: 240mg
- Fat: 6g
- Saturated Fat: 4g
- Unsaturated Fat: 2g
- Trans Fat: 0g
- Carbohydrates: 23g
- Fiber: 4g
- Protein: 1g
- Cholesterol: 15mg
Keywords: glazed carrots, honey glazed carrots, thanksgiving carrots, christmas carrots, holiday side dish